Leaderboard


Popular Content
Showing content with the highest reputation on 10/09/2019 in Posts
-
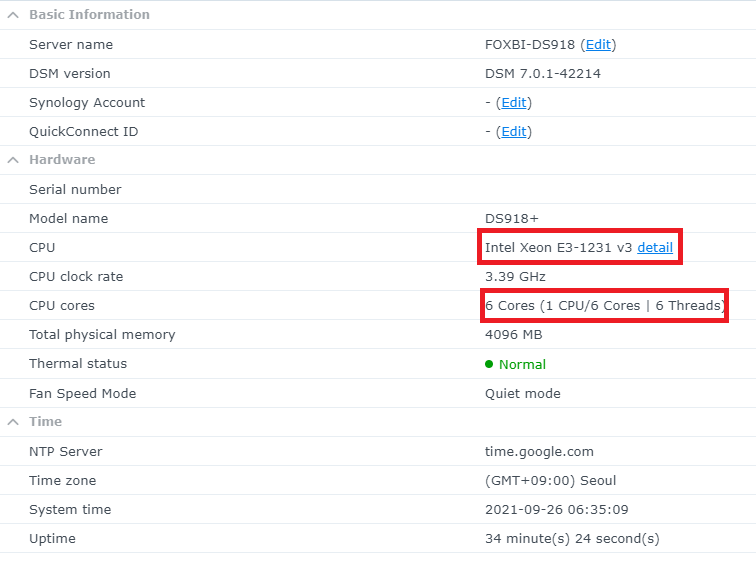
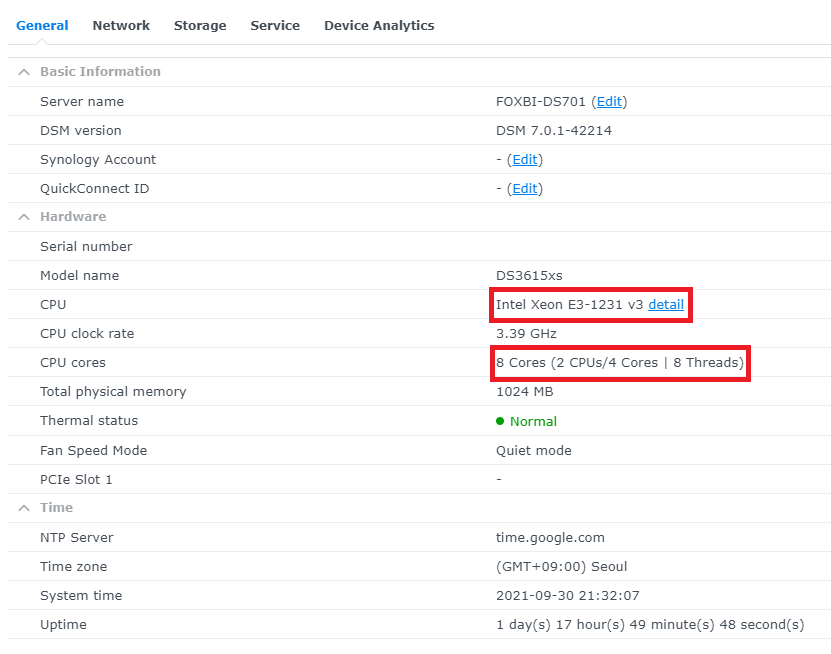
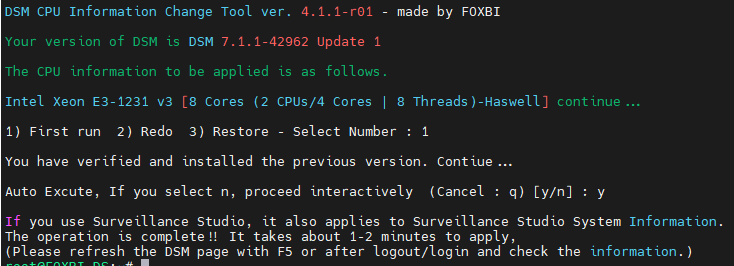
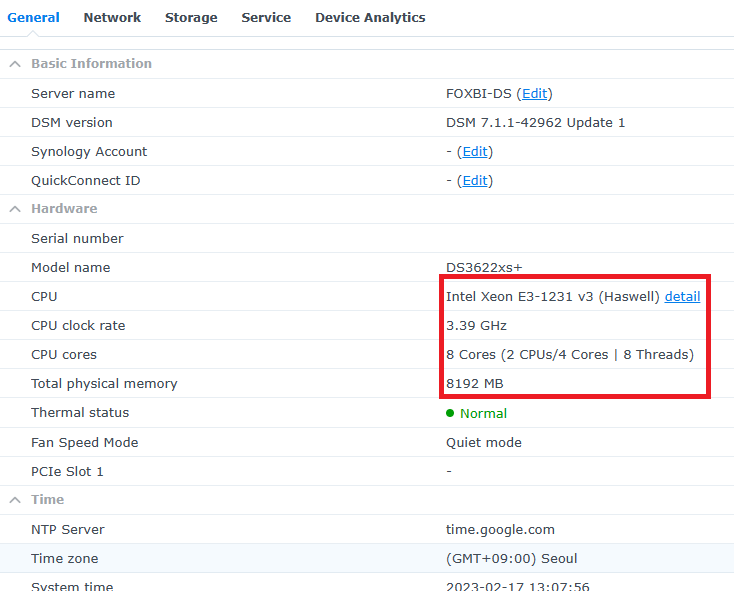
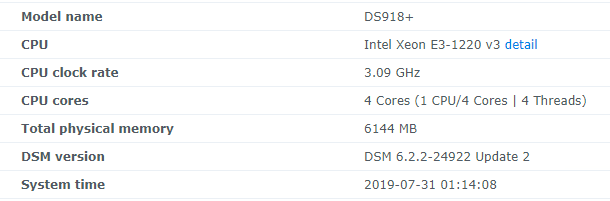
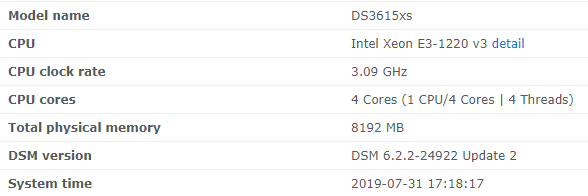
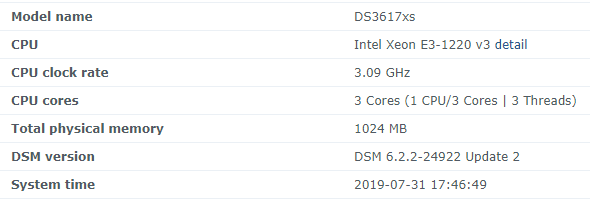
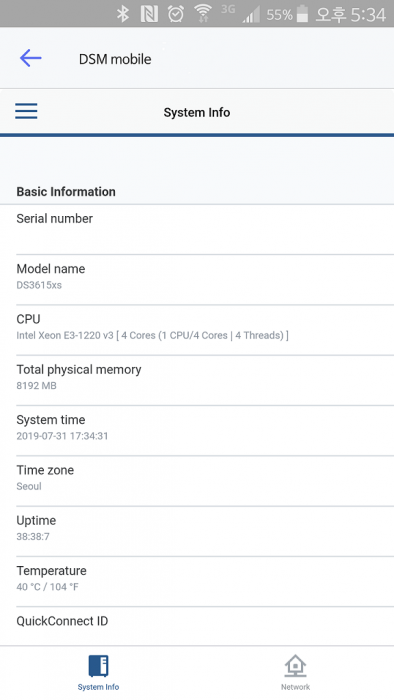
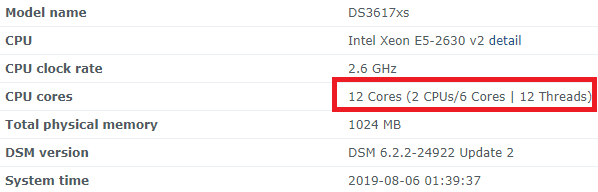
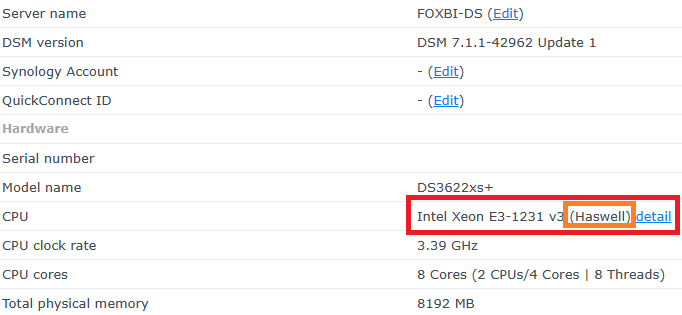
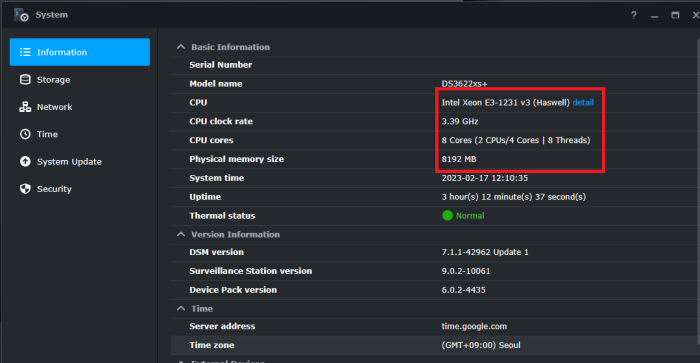
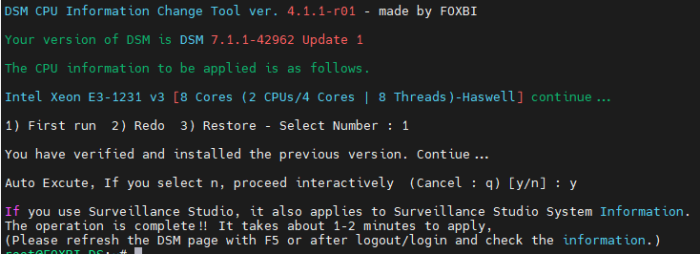
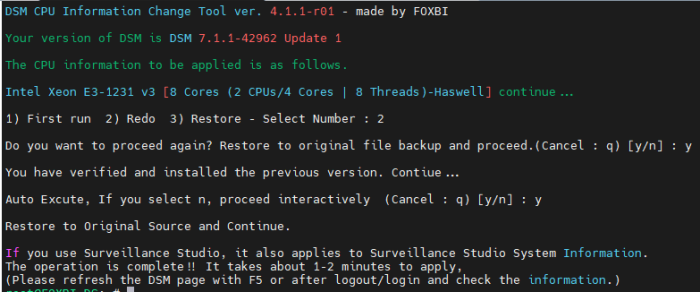
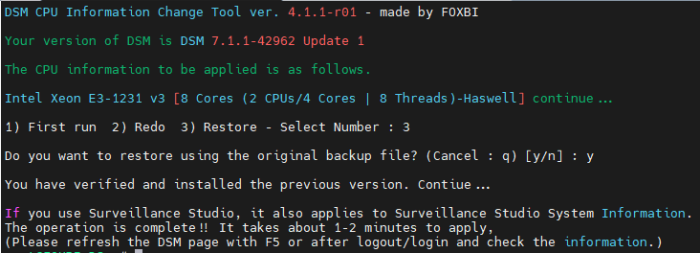
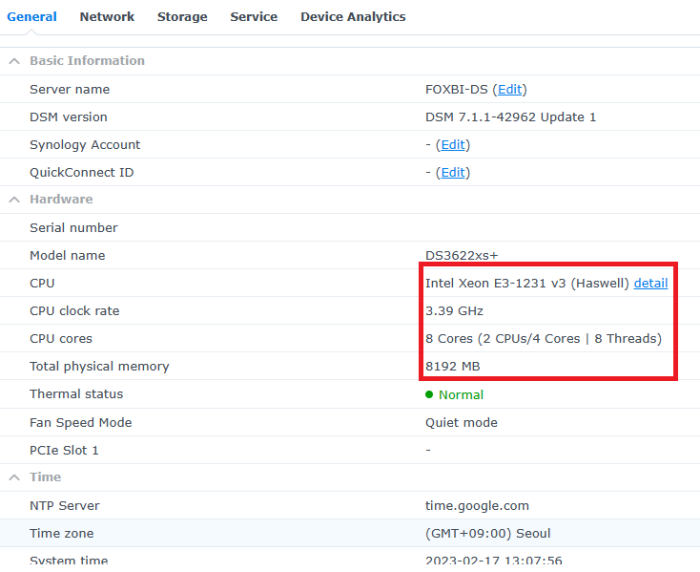
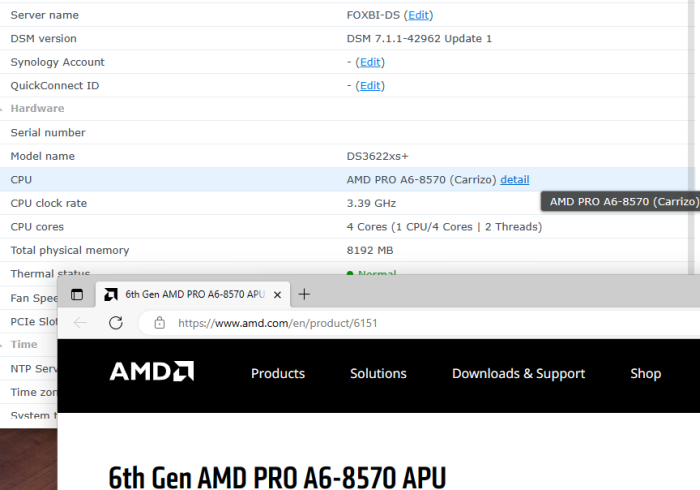
Hello! I am xpenology user. And I am an IT engineer who creates shell scripts as hobbies. Please understand that it is written by a google translate site. because i’m korean who is not fluent in English. I created a tool to change cpu information for Xpenology’s users. Modify the actual cpu name and cores of your pc or server. Howto Run ============================================================= 1. Download attached file on your PC (ch_cpuinfo.tar) (ch_cpuinfo_en.tar) / (ch_cpuinfo_kr.tar is file for korean) 2. Upload file to your DSM location (by filestation, sftp, webdav etc....) 3. Connect to ssh by admin account. (dsm > control panel > terminal & snmp > terminal > enable ssh check) 4. Switch user to root: sudo su - (input admin password) 5. Change directory to where ch_cpuinfo.tar file is located: cd /volume1/temp 5-1. in another way, Download ch_cpuinfo.tar with wget wget https://github.com/FOXBI/ch_cpuinfo/releases/download/ch_cpuinfo/ch_cpuinfo.tar 6. Decompress file & check file: tar xvf ch_cpuinfo.tar ls -lrt (check root’s run auth) 7. Run to Binary file ./ch_cpuinfo or ./ch_cpuinfo.sh (If you use busybox in DSM 5.x, you can use it as a source file) 8. When you execute it, proceed according to the description that is output. 9. Check your DSM’s CPU name, CPU cores at “information center” made a video of the how to run ch_cpuinfo. Extra Action If you want to use ch_cpuinfo in your language Modify and use the LANG.txt file in the same path as ch_cpuinfo. It is possible to use after changing the English content of each variable after translation and changing the value of CUSTLANG in line 8 to Y. Sample image(by Google trans) ==================================================== Addtional, Adjust binary to excute file made by shc(http://www.datsi.fi.upm.es/~frosal) The tool does not inclue worms, bad code. If you want to edit the CPU information yourself manually, please refer to the contents below. ——————————————————————————————————————————————————————————————— Location : /usr/syno/synoman/webman/modules/AdminCenter Source : admin_center.js / admin_center.js.gz(above 6.2) Add Before -> if(Ext.isDefined(h.cpu_vendor)&&Ext.isDefined(h.cpu_family)&&Ext.isDefined(h.cpu_series)){ o.push([_T("status","cpu_model_name"),String.format("{0} {1} {2}",h.cpu_vendor,h.cpu_family,h.cpu_series)])} if(Ext.isDefined(h.cpu_cores)){o.push([_T("status","cpu_cores"),h.cpu_cores])} Add contents: h.cpu_vendor="Intel";h.cpu_family="Xeon";h.cpu_series="E3-1220 V3";h.cpu_cores="4 Cores (1 CPU/4 Cores | 4 Threads)"; h.cpu_detail="<a href='https://ark.intel.com/content/www/us/en/ark/search.html?_charset_=UTF-8&q=E3-1220 V3' target=_blank>detail</a>" Change contens: String.format("{0} {1} {2}",h.cpu_vendor,h.cpu_family,h.cpu_series) to String.format("{0} {1} {2} {3}",h.cpu_vendor,h.cpu_family,h.cpu_series,h.cpu_detail) ——————————————————————————————————————————————————————————————— Finally, All descriptions are based on version 6.2, and the actual executable file supports 5.x, 6.x and 7.x Publish the source through github(https://github.com/FOXBI/ch_cpuinfo). For versions DSM 6.x and later, you can use the binary as before. If you use busybox in DSM 5.x, you can use it as a source file(ch_cpuinfo.sh). Please contact me by comment or bug report, i’ll respond to you as much as possible within my ability. Test & Made Environment ———————————————————————————————————— Base Server : HP ML310e v2 gen8 + VMware ESXi 6.0 + RDM DSM : DSM 6.2.3-25426 Update 3 (DS3615xs) Base Server : HP ML310e v2 gen8 + VMware ESXi 6.0 DSM : DSM 7.0.1-42214 (DS3615xs) Base Server : HP ML310e v2 gen8 + VMware ESXi 6.0 DSM : DSM 7.0.1-42214 (DS918+) Base Server : HP ML310e v2 gen8 + VMware ESXi 6.0 DSM : DSM 6.2.4-25556 (DS3615xs) Base Server : Intel E5-2630 v2 + VMware ESXi 6.7u2 DSM : 6.2.2-24922 Update 2 (DS3617xs) ———————————————————————————————————— Change Log Update new version (ch_cpuinfo ver 4.2.0-r01) 2023.02.18 - Application of AMD's CPU information collection function improvement - xpenlib(cpu_info.sh) refered https://github.com/FOXBI/xpenlib/blob/main/cpu_info.sh Update new version (ch_cpuinfo ver 4.2.1-r01) 2023.03.05 - Fixed error when users of previous version perform redo with version 4.2.0-r01 (Thanks for the @Mentat report.) I am sorry for not being able to actively respond to your inquiries due to busy life. Thank you!! Have a nice day!! Cheer up!! We can do it!! Reduce activity & Stay home & Wear a Mask!! Let's overcome COVID-19 !! Let's pray and support together for the two countries where the earthquake caused great damage and many deaths and missing people. ============================================= Download links: ch_cpuinfo ver 4.2.0-r01 - new version update -> ch_cpuinfo ver 4.2.1-r01 - new version update -> ch_cpuinfo.tar Reference images # 1.04b + DS918+ # 1.03b + DS3615xs # 1.03b + DS3617xs # Normal output is possible even when using more than 8core. # Support DSM 7.x


 1 point
 -
DSM 6.2.3 will not work with these drivers, if you install or update you will fall back to "native" drivers that come with DSM, like no realtek nic on 3615/17 but on 918+ or no mpt2/mpt3sas on 918+ or no broadcom onboard nic on HP microserver or Dell server read this if you want to know about "native" drivers https://xpenology.com/forum/topic/13922-guide-to-native-drivers-dsm-617-and-621-on-ds3615/ synology reverted the changes made in 6.2.2 so the old drivers made for 6.2.(0) are working again and there are new drivers made for 6.2.3 too (we got recent kernel source from synology lately) https://xpenology.com/forum/topic/28321-driver-extension-jun-104b-for-dsm623-for-918/ This is the new 2nd test version of the driver extension for loader 1.04b and 918+ DSM 6.2.2, network drivers for intel and realtek are now all latest and the same as in 3615/17 from mid. december (also broadcoam tg3 driver is working), tries to address the problems with the different GPU's by haveing 3 versions of the pack additional information and packages for 1.03b and 3615/3617 are in the lower half under a separate topic (i will unify the 918+ and 3615/17 parts later as they are now on the same level again) mainly tested as fresh install with 1.04b loader with DSM 6.2.2, there are extra.lzma and extra2.lzma in the zip file - you need both - the "extra2" file is used when booting the 1st time and under normal working conditions the extra.lzma is used (i guess also normal updates - jun left no notes about that so i had to find out and guess). Hardware in my test system used additional driver: r8168, igb, e1000e, bnx2x, tn40xx, mpt2sas The rest of the drivers just load without any comment on my system, i've seen drivers crashing only when real hardware is present so be warned, i assume any storage driver beside ahci and mps2sas/mpt3sas as not working, so if you use any other storage as listed before you would need to do a test install with a new usb and a single empty disk to find out before doing anything with your "production" system i suggest testing with a new usb and a empty disk and it that's ok then you have a good chance for updating for updating its the same as below in the 3615/17 section with case 1 and 2 but you have extra.lzma and extra2.lzma and you will need to use https://archive.synology.com/download/DSM/release/6.2.2/24922/DSM_DS918+_24922.pat most important is to have zImage and rd.gz from the "DSM_DS918+_24922.pat" file (can be opened with 7zip) together with the new extra/extra2, same procedure as for the new extra for 3615/17 (see below) all 4 files extra.lzma, extra2.lzma (both extracted from the zip downloaded), zImage and rd.gz go to the 2nd partition of the usb (or image when using osfmount), replacing the 4 files there if you want the "old" files of the original loader back you can always use 7zip to open the img file from jun and extract the original files for copying them to usb if really wanting to test with a running 6.2.x system then you should empty /usr/lib/modules/update/ and /usr/lib/firmware/i915/ before rebooting with the new extra/extra2 rm -rf /usr/lib/modules/update/* rm -rf /usr/lib/firmware/i915/* the loader will put its files on that locations when booting again, this step will prevent having old incompatible drivers in that locations as the loader replaces only files that are listed in rc.modules and in case of "syno" and "recovery" there are fewer entries, leaving out i915 related files, as long as the system boots up this cleaning can be done with the new 0.8 test version there a 3 types of driver package, all come with the same drivers (latest nic drivers for realtek and intel) and conditions/limitations as the 3615/17 driver set from mid. december (mainly storage untested, ahci and mpt3sas is tested). 1. "syno" - all extended i915 stuff removed and some firmware added to max compatibility, mainly for "iGPU gen9" (Skylake, Apollo Lake and some Kaby Lake) and older and cases where std did not work, i915 driver source date: 20160919, positive feedback for J3455, J1800 and N3150 2. "std" - with jun's i915 driver from 1.04b (tested for coffee lake cpu from q2/2018), needed for anything newer then kaby lake like gemini lake, coffee lake, cannon lake, ice lake, i915 driver source date: 20180514 - as i had no source i915 driver is the same binary as in jun's original extra/extra2, on my system its working with a G5400, not just /dev/dri present, tested completely with really transcoding a video, so its working in general but might fail in some(?) cases, also 8th/9th gen cpu like i3/i5 8100/9400 produce a /dev/dri, tested with a 9400 and it does work 3. "recovery" - mainly for cases where the system stops booting because of i915 driver (seen on one N3150 braswell), it overwrites all gpu drivers and firmware with files of 0 size on booting so they can't be loaded anymore, should also work for any system above but guarantees not having /dev/dri as even the firmware used from the dsm's own i915 driver is invalid (on purpose) - if that does not work its most likely a network driver problem, safe choice but no transcoding support start with syno, then std and last resort would be recovery anything with a kernel driver oops in the log is a "invalid" as it will result in shutdown problems - so check /var/log/dmesg the often seen Gemini Lake GPU's might work with "std", pretty sure not with "syno", most (all?) testers with gemini lake where unsuccessful with "std" so if you don't like experimenting and need hardware transcoding you should wait with the version you have the "_mod" on the end of the loader name below is a reminder that you need to to "modding" as in make sure you have zImage and rd.gz from DSM 6.2.2 on you usb for booting, the new extra.lzma will not work with older files 0.8_syno ds918+ - extra.lzma/extra2.lzma for loader 1.04b_mod ds918+ DSM 6.2.2 v0.8_syno https://gofile.io/d/mVBHGi SHA256: 21B0CCC8BE24A71311D3CC6D7241D8D8887BE367C800AC97CE2CCB84B48D869A Mirrors by @rcached https://clicknupload.cc/zh8zm4nc762m https://dailyuploads.net/qc8wy6b5h5u7 https://usersdrive.com/t0fgl0mkcrr0.html https://www104.zippyshare.com/v/hPycz12O/file.html 0.8_std ds918+ - extra.lzma/extra2.lzma for loader 1.04b_mod ds918+ DSM 6.2.2 v0.8_std https://gofile.io/d/y8neID SHA256: F611BCA5457A74AE65ABC4596F1D0E6B36A2749B16A827087D97C1CAF3FEA89A Mirrors by @rcached https://clicknupload.cc/h9zrwienhr7h https://dailyuploads.net/elgd5rqu06vm https://usersdrive.com/peltplqkfxvj.html https://www104.zippyshare.com/v/r9I7Tm0K/file.html 0.8_recovery ds918+ - extra.lzma/extra2.lzma for loader 1.04b_mod ds918+ DSM 6.2.2 v0.8_recovery https://gofile.io/d/4K3WPE SHA256: 5236CC6235FB7B5BB303460FC0281730EEA64852D210DA636E472299C07DE5E5 Mirrors by @rcached https://clicknupload.cc/uha07uso7vng https://dailyuploads.net/uwh710etr3hm https://usersdrive.com/ykrt1z0ho7cm.html https://www104.zippyshare.com/v/7gufl3yh/file.html !!! still network limit in 1.04b loader for 918+ !!! atm 918+ has a limit of 2 nic's (as the original hardware) If there are more than 2 nic's present and you can't find your system in network then you will have to try after boot witch nic is "active" (not necessarily the onboard) or remove additional nic's and look for this after installation You can change the synoinfo.conf after install to support more then 2 nic's (with 3615/17 it was 8 and keep in mind when doing a major update it will be reset to 2 and you will have manually change this again, same as when you change for more disk as there are in jun's default setting) - more info's are already in the old thread about 918+ DSM 6.2.(0) and here https://xpenology.com/forum/topic/12679-progress-of-62-loader/?do=findComment&comment=92682 I might change that later so it will be set the same way as more disks are set by jun's patch - syno's max disk default for this hardware was 4 disks but jun's pach changes it on boot to 16!!! (so if you have 6+8 sata ports then you should not have problems when updating like you used to have with 3615/17) Basically what is on the old page is valid, so no sata_*, pata_* drivers Here are the drivers in the test version listed as kernel modules: The old thread as reference !!! especially read "Other things good to know about DS918+ image and loader 1.03a2:" its still valid for 1.04b loader !!! This section is about drivers for ds3615xs and ds3617xs image/dsm version 6.2.2 (v24922) Both use the same kernel (3.10.105) but have different kernel options so don't swap or mix, some drivers might work on the other system some don't at all (kernel oops) Its a test version and it has limits in case of storage support, read careful and only use it when you know how to recover/downgrade your system !!! do not use this to update when you have a different storage controller then AHCI, LSI MPT SAS 6Gb/s Host Adapters SAS2004/SAS2008/SAS2108/SAS2116/SAS2208/SAS2308/SSS6200 (mpt2sas) or LSI MPT SAS 12Gb/s Host Adapters SAS3004/SAS3008/SAS3108 (mpt3sas - only in 3617), instead you can try a fresh "test" install with a different usb flash drive and a empty single disk on the controller in question to confirm if its working (most likely it will not, reason below) !!! The reason why 1.03b loader from usb does not work when updating from 6.2.0 to 6.2.2 is that the kernel from 6.2.2 has different options set witch make the drivers from before that change useless (its not a protection or anything), the dsm updating process extracts the new files for the update to HDD, writes the new kernel to the usb flash drive and then reboots - resulting (on USB) in a new kernel and a extra.lzma (jun's original from loader 1.03b for dsm 6.2.0) that contains now incompatible drivers, the only drivers working reliable in that state are the drivers that come with dsm from synology Beside the different kernel option there is another thing, nearly none of the new compiled scsi und sas drivers worked They only load as long as no drive is connected to the controller. ATM I assume there was some changes in the kernel source about counting/indexing the drives for scsi/sas, as we only have the 2.5 years old dsm 6 beta kernel source there is hardly a way to compensate People with 12GBit SAS controllers from LSI/Avago are in luck, the 6.2.2 of 3617 comes with a much newer driver mpt3sas then 6.2.0 and 6.2.1 (13.00 -> 21.00), confirmed install with a SAS3008 based controller (ds3617 loader) Driver not in this release: ata_piix, mptspi (aka lsi scsi), mptsas (aka lsi sas) - these are drivers for extremely old hardware and mainly important for vmware users, also the vmw_pvscsi is confirmed not to work, bad for vmware/esxi too Only alternative as scsi diver is the buslogic, the "normal" choice for vmware/ESXi would be SATA/AHCI I removed all drivers confirmed to not work from rc.modules so they will not be loaded but the *.ko files are still in the extra.lzma and will be copied to /usr/modules/update/ so if some people want to test they can load the driver manually after booting These drivers will be loaded and are not tested yet (likely to fail when a disk is connected) megaraid, megaraid_sas, sx8, aacraid, aic94xx, 3w-9xxx, 3w-sas, 3w-xxxx, mvumi, mvsas, arcmsr, isci, hpsa, hptio (for some explanation of what hardware this means look into to old thread for loader 1.02b) virtio driver: i added virtio drivers, they will not load automatically (for now), the drivers can be tested and when confirmed working we will try if there are any problems when they are loaded by default along with the other drivers they should be in /usr/modules/update/ after install To get a working loader for 6.2.2 it needs the new kernel (zImage and rd.gz) and a (new) extra.lzma containing new drivers (*.ko files) zImage and rd.gz will be copied to usb when updating DSM or can be manually extracted from the 6.2.2 DSM *.pat file and copied to usb manually and that's the point where to split up between cases/way's case 1: update from 6.2.0 to 6.2.2 case 2: fresh install with 6.2.2 or "migration" (aka upgrade) from 6.0/6.1 Case 1: update from 6.2.0 to 6.2.2 Basically you semi brick your system on purpose by installing 6.2.2 and when booting fails you just copy the new extra.lzma to your usb flash drive by plugging it to a windows system (witch can only mount the 2nd partition that contains the extra.lzma) or you mount the 2nd partition of the usb on a linux system Restart and then it will finish the update process and when internet is available it will (without asking) install the latest update (at the moment update4) and reboot, so check your webinterface of DSM to see whats going or if in doubt wait 15-20 minutes check if the hdd led's are active and check the webinterface or with synology assistant, if there is no activity for that long then power off and start the system, it should work now Case 2: fresh install with 6.2.2 or "migration" (aka upgrade) from 6.0/6.1 Pretty much the normal way as described in the tutorial for installing 6.x (juns loader, osfmount, Win32DiskImager) but in addition to copy the extra.lzma to the 2nd partition of the usb flash drive you need to copy the new kernel of dsm 6.2.2 too so that kernel (booted from usb) and extra.lzma "match" You can extract the 2 files (zImage and rd.gz) from the DSM *.pat file you download from synology https://archive.synology.com/download/DSM/release/6.2.2/24922/DSM_DS3615xs_24922.pat or https://archive.synology.com/download/DSM/release/6.2.2/24922/DSM_DS3617xs_24922.pat These are basically zip files so you can extract the two files in question with 7zip (or other programs) You replace the files on the 2nd partition with the new ones and that's it, install as in the tutorial In case of a "migration" the dsm installer will detect your former dsm installation and offer you to upgrade (migrate) the installation, usually you will loose plugins, but keep user/shares and network settings DS3615: extra.lzma for loader 1.03b_mod ds3615 DSM 6.2.2 v0.5_test https://gofile.io/d/iQuInV SHA256: BAA019C55B0D4366864DE67E29D45A2F624877726552DA2AD64E4057143DBAF0 Mirrors by @rcached https://clicknupload.cc/h622ubb799on https://dailyuploads.net/wxj8tmyat4te https://usersdrive.com/sdqib92nspf3.html https://www104.zippyshare.com/v/Cdbnh7jR/file.html DS3617: extra.lzma for loader 1.03b_mod ds3617 DSM 6.2.2 v0.5_test https://gofile.io/d/blXT9f SHA256: 4A2922F5181B3DB604262236CE70BA7B1927A829B9C67F53B613F40C85DA9209 Mirrors by @rcached https://clicknupload.cc/0z7bf9stycr7 https://dailyuploads.net/68fdx8vuwx7y https://usersdrive.com/jh1pkd33tmx0.html https://www104.zippyshare.com/v/twDIrPXu/file.html1 point
-
Long time user of Xpenology under ESXi on older hardware. Started a new baremetal build with new hardware and thought I'd share my experiences. Haven't been able to find anyone using the B365 chipset so thought I'd give it a go and report on functionality. CPU = Intel i5-9400 Motherboard = Asrock B365M Pro4 Micro ATX RAM = 16GB HyperX Fury 2666Mhz (2x 8GB) NIC = HP NC360T PCIe (Dual Intel NIC) USB = Sandisk Cruzer Fit 8GB Will be recycling old hardware in but not there yet, just validating new hardware. HBA = LSI 9201-16i 16 port PCIe (IT mode) Hard Drives = 8x 3TB Seagate Enterprise Drives, 4x 256GB SSD (Brand escapes me at the moment) Case = Fractal Node 804 The Good All basic functionality worked, out of box. Using 918+ 1.04b loader booted and performed install, no issues. UEFI boot works. Patched to latest build via GUI without issues. Powers off, reboots and WOL all working perfectly. (Had issues on some old hardware) Cold boots fast with no delays. (have read other experienced long boot times) Didn't need to tweak BIOS settings at all for first boot. I did subsequently go back and tuned some BIOS settings as follows. Disabled onboard NIC (I219V, knew it wasn't going to work), disabled onboard audio and wifi/bluetooth (no module installed anyway), disabled C1E state. CPU temp is monitored in Xpenology (Have had issues before with some hardware reading sensor) Seems to have full fan control with all options available but requires further validation. Again hasn't worked with some older hardware I've used but that may not be surprise to other users. CPU/Cores recognised and report accurately thanks to FOXBI's "ch_cpuinfo.tar" mod. VMM works and detected CPU & core correctly. Quick built a Win server 2016, powered on and booted fine. I only ran it for about 15 minutes but looked and worked well. With MB, CPU, RAM, PCIe NIC Card and 1 SSD connected and booted to Xpenology, seems to idle around 20w power usage but will confirm with more accurate meter. The Bad Onboard NIC is not recognised. As with all newer motherboards, the Intel I219V is not recognised, I knew it wouldn't, but have a stack of old PCIe Intel NICs so no issue for me. Hardware transcoding looks to be an issue. Cannot get /dev/dri folder to appear. Have done some BIOS settings with the GPU, to no avail. Have tried i915.alpha_support=1 in the GRUB file to no avail. To be fair, there seems to be little info on this setting and I'm probably putting it in the wrong location. I will troubleshoot further and advise. Was really a nice-to-have for me as I run separate Intel NUC for Plex, which handles the transcoding role well. That's probably it for now, from a couple of hours testing last night, so pretty pleased so far. If people are interested, I'll continue to update thread as further testing and commissioning occurs. Cheers.1 point
-
SUCCESS!!! I now have access to my data! mdadm --assemble --force --run /dev/md2 /dev/sdg5 /dev/sdh5 /dev/sdi5 /dev/sdk5 /dev/sdl5 /dev/sdm5 /dev/sdj5 /dev/sdn5 -v vgchange -a y vg1000 lvm lvchange -ay /dev/mapper/vg1000-lv mount /volume1 was the magic commands. Any ideas on how to re-create the Meta-data of Shared Folders? I can see in the log that it was removed after reboot following the crash.1 point
-
Look up the real3x mod to disable the faulty i915 video driver, the combination you are proposing works fine.1 point
-
i hope next weekend last thing i remember from last year is that i compiled some of this but people got nowhere with it because the kernel options in the synology kernel where not set (we cant change the kernel), but we might try later again atm i want to do the drivers for 3615/17, then some newer versions of drivers people need1 point
-
Don't bother with the Synology package its far too limiting, do the steps below and you can run as many Wordpress sites as you like on your NAS: - Install MariaDB package, set the root password. - Install phpmyadmin and create your Wordpress database. - Then create a shared folder, set the permissions to include local group http. - Then download the Wordpress install zip from Wordpress.org. - Unzip it directly into the shared folder you created. - Copy all the contents of the Wordpress folder into the root of the shared folder. - Open Web Station - Create a new virtual server and point it to your new shared folder - Connect to whatever you called your virtualserver - The Wordpress setup page will appear - The only thing that you need to know that's special from here is on Synology your host address for MariaDB is this format to use in the Wordpress install: 127.0.0.1:/run/mysqld/mysqld10.sock Thats it, as long as you create virtual server names that are unique you can create as many Wordpress sites as you like. Note; in order to automatically upgrade Wordpress or install plugins via the GUI you will need to chmod +x the shared folder you created.1 point
-
OK, that was a stupid question (maybe every body could guess it??? ) I restarded my NAS and eveything is fine now 🙈1 point
-
Стратегически правильное решение не заниматься костылями, а поставить сетевуху Intel или HP и юзать без виртуализации... Я отказался от виртуальной DSM когда попробовал пробросить диски и попытался покрутить бесперебойник к EXSI по USB... После этого я понял что такой гемморой не для меня...1 point
-
1) Uninstall Video Station 2) Install Docker 3) Install Plex or Emby or Jellyfin 4) profit1 point