Leaderboard


Popular Content
Showing content with the highest reputation on 03/06/2019 in all areas
-
Биос был 1.4, но я вернулся на 1.3 (кажется она стабильнее) кроме HPET, выключил все что можно (Disable - C-states, SpeedStep, C1E, Suspend to ram). VT-d должна быть включена, влияет на DRM. USB legacy - Enable. CSM - Enable (PXE not used, Storage - Legacy only, Video not used Это важно) После перезагрузки, в BIOS не зайти. Поможет только перемычка ClearCMOS Power - Sport ShareMemory - 64Mb SuperIO - Disable Trysted - Disable IntelPlatformTryst - Disable Загружаться с флэшки в режиме Legacy (Выбрать в ручную не UEFI загрузчик) Почему в не UEFI? После тестов и сравнения логов с EFI и Legacy, было обнаружено что мать не правильно загружается в EFI, дисковая система начинает тормозить, в логах ошибки по RAID. Происходит рассинхронизация. Проблема в матери. Еще заметил что на встроенной сетевой карте сервак загружается минуту дольше чем на внешней Intel. И последнее предположение что транскодинг заработал после миграции с 916 на 918. Так как пробовал устанавливать на отдельный жестки начисто, в VS фризы как у всех. Скорее всего проблема в конфигах 918. А после миграции какая то часть остается от 916. Скрещивание бульдога с носорогом. Extra.lzma записывал от x01015918 на флэшку перед миграцией. После миграции папка /dev/dri появилась и VideoStation и Plex заработали. И на счет HPET, ее я ни разу не выключал. Теперь на нее думаю. Будет время свободное, выключу попробую. Это надо заново весь биос настраивать, после сброса.2 points
-
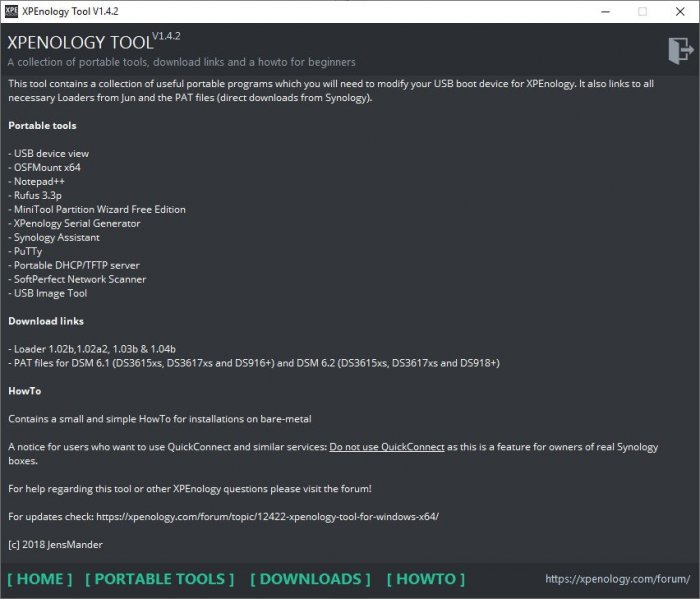
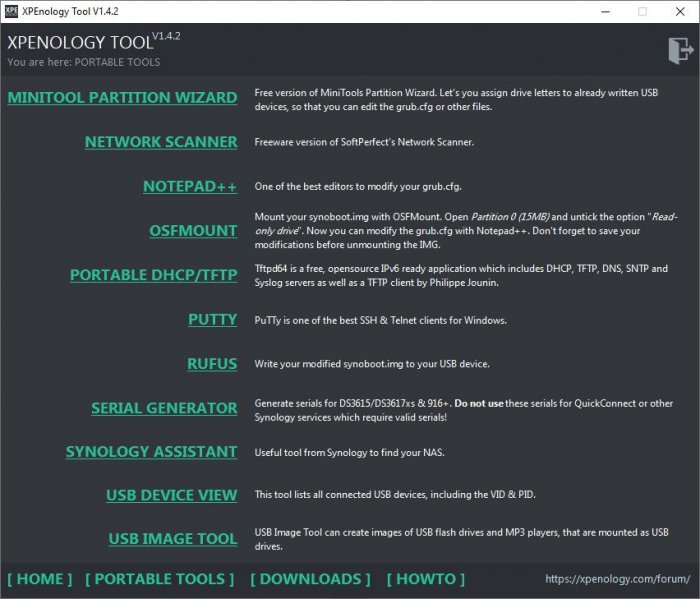
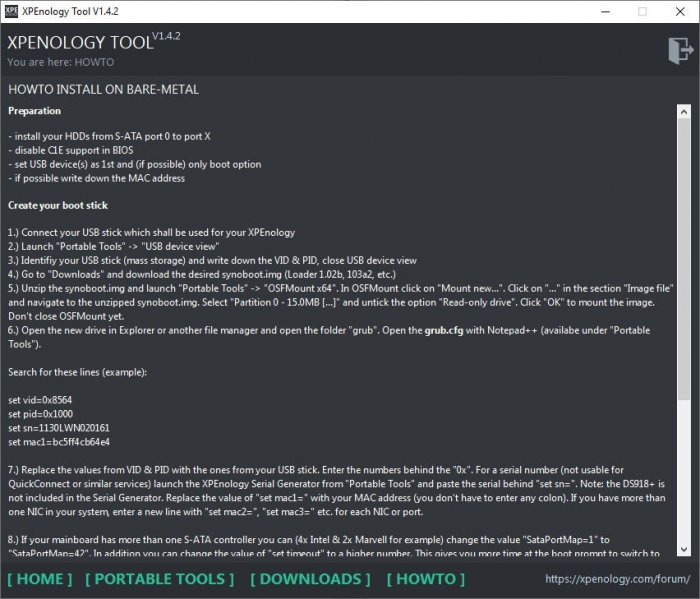
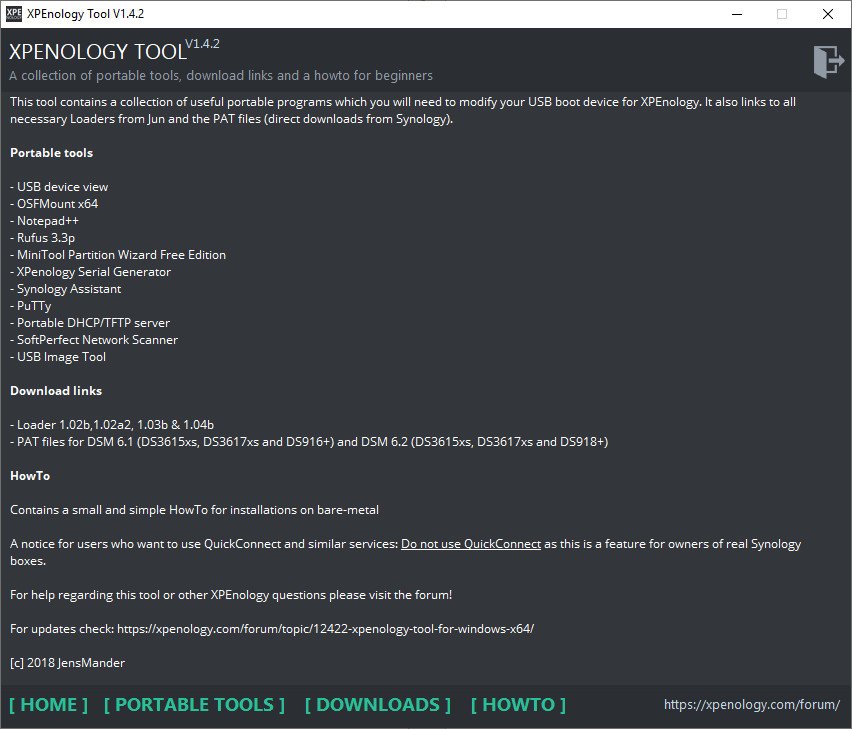
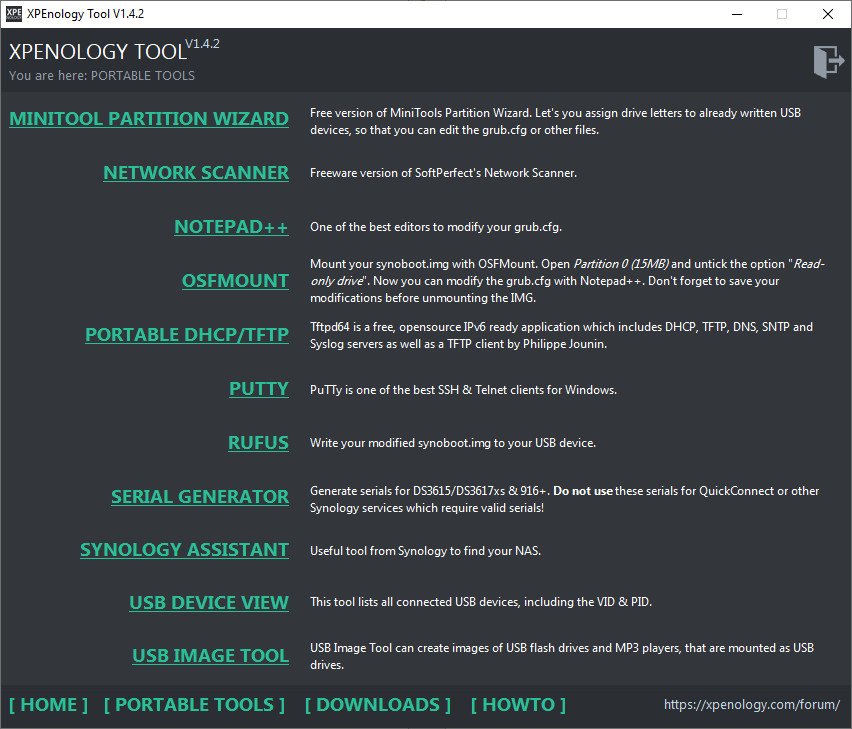
Hi! I made a little tool which can help you to get your XPEnology up & running without installing any software. It contains (as portable versions): - Nirsoft's USB device view (helps to identify the VID & PID of your USB boot media) - V2.76 - XPEnology Serial Generator for DS3615XS, DS3617XS and DS916+ (a converted version of the HTML site) - Win32 DiskImager (to write your modified synoboot.img to your USB boot media) - V1.0 (only available in V1.4.1) - OSFMount x64 (to mount the synoboot.img and modifiy it) - V1.5 - Notepad++ (best editor for changing values inside grub.cfg) - V7.5.3 - Synology Assistant (useful tool from Synology to find your XPEnology and install DSM) - V6.2-23733 - TFTP/DHCP portable (a small TFTP, DHCP and Syslog server by Ph. Jounin) - V4.6.2 - MiniTool Partition Wizard 10 (helps assigning already formatted/written USB devices to modify existing grub.cfg) - V10.3 - SoftPerfect Network Scanner - V6.2.1 - USB Image Tool - V1.75 - New: Rufus - V3.3 In the section "Downloads" all links open corresponding websites to download the files. For beginners I added a small HowTo for bare-metal installation. Update New link for download: https://mega.nz/#F!BtViHIJA!uNXJtEtXIWR0LNYUEpBuiA The download link/folder also contains @IG-88's extra.lzma (V0.6) for the DS918+. You'll have to run it "As Administrator" because some of these tools (like Win32 DiskImager) need to be executed with higher rights. It's possible that the SmartScreen filter will give you a warning, because the EXE isn't signed. Bug reports and comments are welcome Cheers Current version: V1.4.2 (2018-11-19)

 1 point
 -
Hi, everyone, Thanks for you patience. A new ds918 loader support 6.2/6.21 is uploaded. whats new: uefi issue fixed. i915 driver updated. link https://mega.nz/#F!Fgk01YoT!7fN9Uxe4lpzZWPLXPMONMA (for DS918+) - v1.04b ---Beginning of addition by polanskiman--- link https://mega.nz/#!OV4gVKyZ!dCgfXx1bgAOyvbFwFiov3s7RSNoFuqnAcNmSllLoUiw (for DS3615xs) - v1.03b link https://mega.nz/#!zcogjaDT!qIEazI49daggE2odvSwazn3VqBc_wv0zAvab6m6kHbA (for DS3617xs) - v1.03b Please read this topic to know what loader to chose: ---End of addition by polanskiman---1 point
-
There is nothing magical about the NC360T. The only thing you need to do is to make sure that the device you are trying to buy is supported by the driver in the image you want to run. Refer to this Intel list: https://www.intel.com/content/www/us/en/support/articles/000005612/network-and-i-o/ethernet-products.html The PRO 1000/CT is device ID 10D3. Now look here (for DS3615) or here (for DS918) and look up the device ID in the appropriate spreadsheet. The 10D3 card is supported by both images, so you should be fine with that card.1 point
-
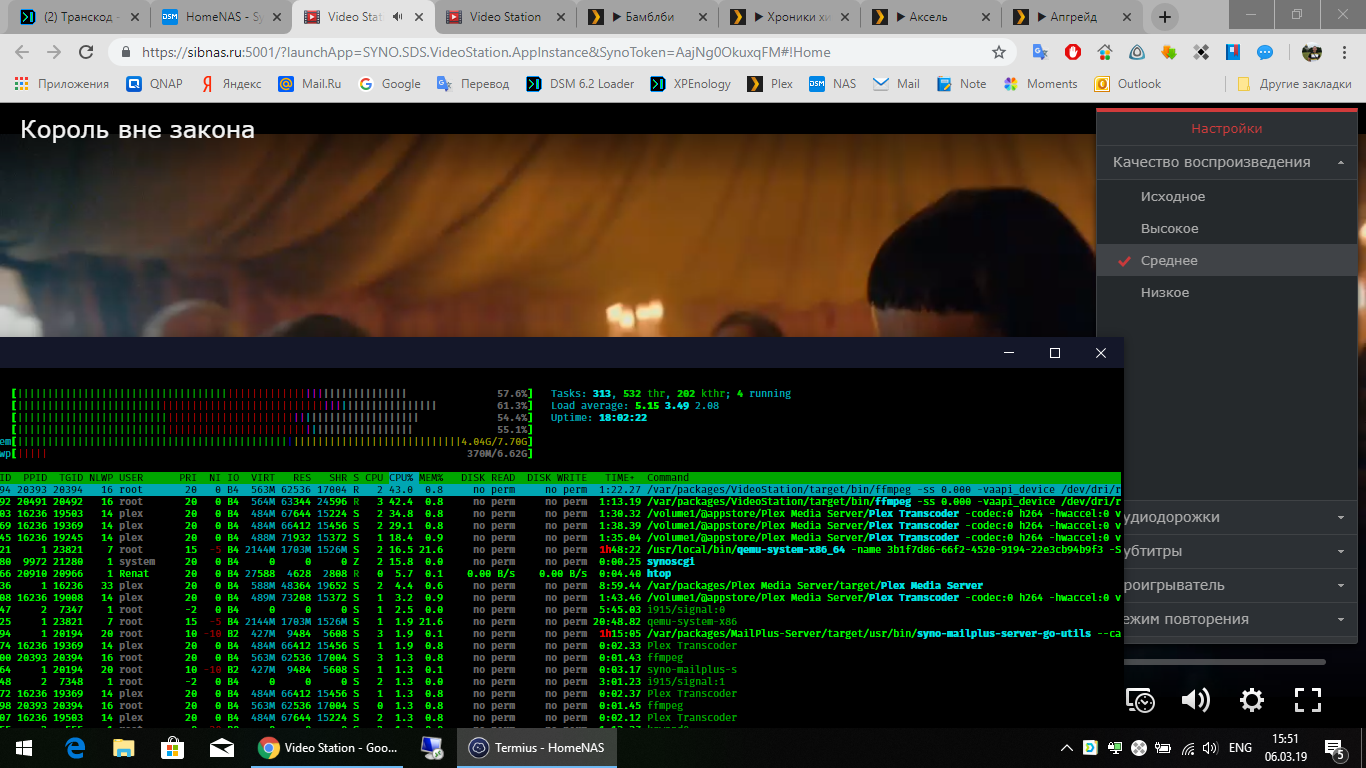
Пять фильмов одновременно в транскоде. 4 Plex и 2 VS Загрузка процессора 70-80%. Как то так.
.thumb.png.7eb4b04b6a5490b8abaff72c696aabdf.png)
 1 point
 -
I have the same setup. I have a small SSD that is my ESXi datastore but all the main spinning disks are passthrough via an LSI controller. So would it be as simply as just copying the files in my vm files as you suggest to a different system? Pardon my ignorance but I'm not an ESXi expert so how do I expose the SSD datastore as a shared file system? Or is in the inverse where I mount an external file system to ESXi and then copy the datastore files to the remote system from ESXi? Would appreciate the specifics there. Thanks.1 point
-
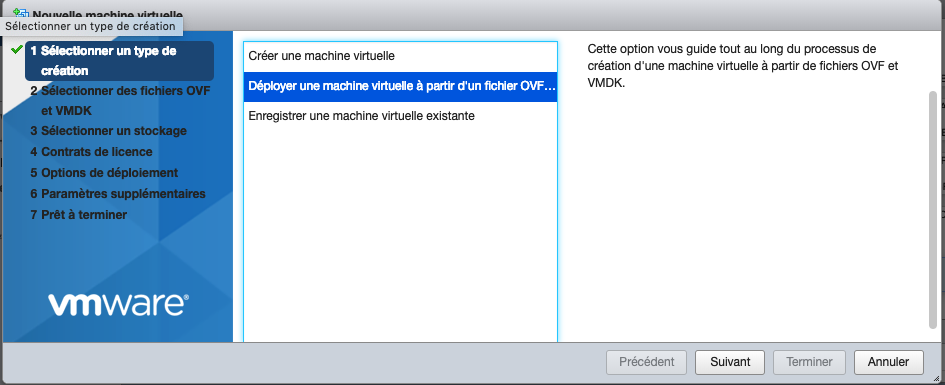
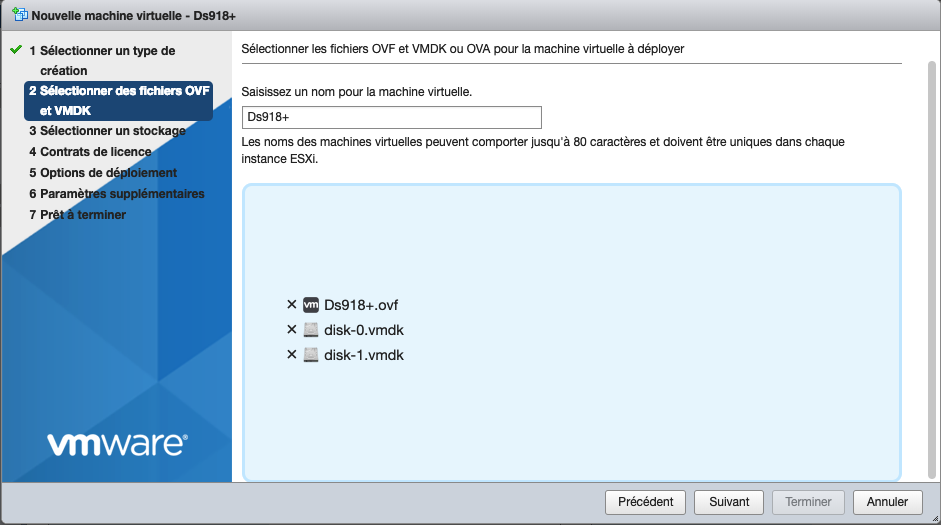
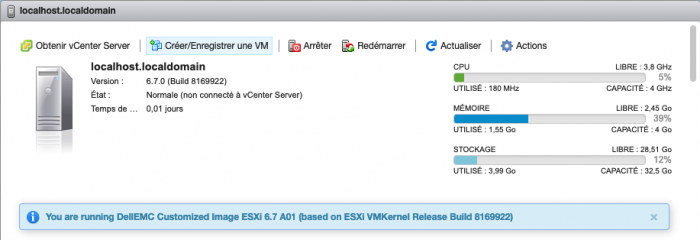
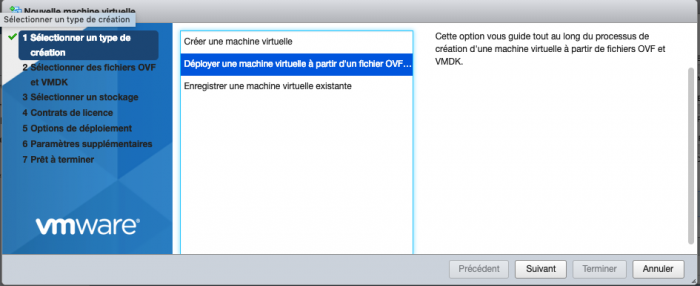
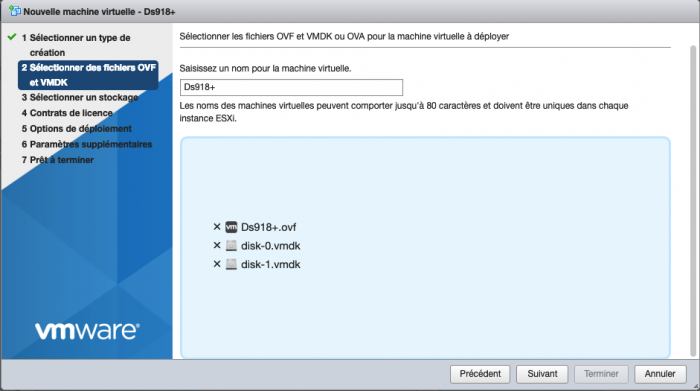
Je viens de faire une machine toute prête Ds918+ avec DSM 6.2.1-23824 Update 6 avec ESXi 6.7. Elle fonctionne parfaitement, je l'ai essayé sur 2 machines différentes ESXi 6.7 : https://drive.google.com/open?id=1yGKoTCtoM60KfG29b6LlCYRHcfe_zRzU 1: créer une nouvelle machine virtuelle 2: Déployer une machine virtuelle à partir d'un fichier OVF 3: Sélectionner les 3 fichiers : Ds918+.ovf , disk-0.vmdk , disk-1.vmdk et donner un nom à votre machine. 4: Suivre les derniers étapes qui sont facile. 5: Vous pouvez ajouter des HDD ou modifier la taille du disque disk-1.vmdk car c'est dans celui-ci que DSM est déjà installé. 6: Attention ne pas modifier le disk-0.vmdk car c'est le boot. Une fois votre machine installée, il faudra télécharger open-vm-tools v10.2.0-1 pour éteindre correctement votre DSM. L'installation se fait depuis le Centre de Paquets depuis DSM " Installation manuelle" Pour le télécharger : https://spk.4sag.ru/ Il faut se rendre sur le nom de votre machine " Ds918+ " Bonne chance ^^ ps: Pour ceux que ça intéresse voici le lien de téléchargement de ESXi 6.7 version customized par Dell VMware-VMvisor-Installer-6.7.0-8169922.x86_64-DellEMC_Customized-A01.iso https://downloads.dell.com/FOLDER04945360M/1/
 1 point
 -
Hi everyone, stupid question but I have not found an answer to the problem I currently have. I have only seen a few other people who have the same experience, but no solution. So I have tried Jun's loader V1.03b for the 3617xs and I have tried V1.04b for the 918+ on my ESXi host. But unfortunately no network connection shows up. I have used the "ESXi" option, tried the e1000 and e1000e but no success. I have changed the serial and matched the MAC with the one on the host with no luck. I guess the loader does no support that network card? How can I figure that out? Can I activate the dmesg log when the loader starts? If yes, how can I do that? I am running ESXi 6.5u2 on two Xeons L5630 on my test-host. Thanks in advance.1 point
-
Login (replace URL, PORT, USER, PASS) https://URL:PORT/webapi/auth.cgi?api=SYNO.API.Auth&method=Login&version=1&account=USER&passwd=PASS for ActiveBackup its the following urls Get Activationstatus https://URL:PORT/webapi/entry.cgi?api=SYNO.ActiveBackup.Activation&method=get&version=1 Set ActivationStatus (use your SERIALNUMBER) https://URL:PORT/webapi/entry.cgi?api=SYNO.ActiveBackup.Activation&method=set&version=1&activated=true&serial_number="SERIALNUMBER" for Office365 its the following urls Get Activationstatus https://URL:PORT/webapi/entry.cgi?api=SYNO.ActiveBackupOffice365&method=get_activation&version=1 Set ActivationStatus (use your SERIALNUMBER) https://URL:PORT/webapi/entry.cgi?api=SYNO.ActiveBackupOffice365&method=set_activation&version=1&serial_number="SERIALNUMBER" for GSuite its the following urls Get Activationstatus https://URL:PORT/webapi/entry.cgi?api=SYNO.ActiveBackupGSuite&method=get_activation&version=1 Set ActivationStatus (use your SERIALNUMBER) https://URL:PORT/webapi/entry.cgi?api=SYNO.ActiveBackupGSuite&method=set_activation&version=1&serial_number="SERIALNUMBER"1 point


.png.988e11bae27181186dfc280484bcead3.png)