Leaderboard


Popular Content
Showing content with the highest reputation on 02/18/2019 in all areas
-
Hey there, this has been asked a couple of times but the only answers (if someone answered at all) were like, "Why bother? It works." In the picture above, both installations work. My inner monk (as well as my boss) prefer the right cabinet, however. In the following example I'll refer to a 10-bay system, if your setup is different, you can easily edit the numbers. I assume, you have successfully installed XPEnology on your box, following Polanskiman's tutorial. If you encountered any problems with drives not being recognized, or displayed as eSATA, etc. you checked Hedii's guide, as well. Still, your drives show up like this, maybe because your chipset would support 6 drives but your mainboard only offers 4 connectors. Drives 1,3,5,6 are connected to the mainboard, drives 7-10 to an additional 4-port controller, drives 11 and 12 to another 2-port controller. Drives 2 and 4 look like this in your dmesg: [ 1.835796] ata1: SATA max UDMA/133 abar m2048@0xfe525000 port 0xfe525100 irq 47 [ 1.835802] ata2: DUMMY [ 1.835806] ata3: SATA max UDMA/133 abar m2048@0xfe525000 port 0xfe525200 irq 47 [ 1.835807] ata4: DUMMY [ 1.835812] ata5: SATA max UDMA/133 abar m2048@0xfe525000 port 0xfe525300 irq 47 [ 1.835813] ata6: SATA max UDMA/133 abar m2048@0xfe525000 port 0xfe525400 irq 47 Playing around with internalportcfg (Hedii's guide) did not help you, getting rid of these "DUMMY" ports. Luckily Jun's loader has a feature called "sata_remap", mentioned here and here, that - well - does what it says. To fill the gaps, you can remap the drives from your 2-port controller. Reboot and press "C" in the GRUB menu. (See Polanskiman's guide "Step 7" and "Note 4" if you need help). At the command line enter: append "sata_remap=10>1:11>3:1>10:3>11" Be aware, that counting starts at 0, here. 10>1 will remap drive 11 to 2, 11>3 will remap drive 12 to 4, etc. After the next reboot, it will look like this: As you can see, the drives are now numbered sequentially from 1 to 10 with the two DUMMYs on ports 11 and 12. Now it's easy to hide them. Like in Hedii's guide open an SSH connection to your NAS and edit as follows: # first file to modify vi /etc/synoinfo.conf # second file to modify vi /etc.defaults/synoinfo.conf # In each file look for the line maxdisks="12" # and change it to maxdisks="10" Reboot and you finally have a 10-bay box displaying 10 sequentially numbered drives: Hope, this will help one or the other. Best Regards, The_Mole


 3 points
 -
ixgbe driver is in the DS918 image. You might want to dig a little deeper in the logs to see what is going on. For your future reference:
 2 points
 -
When setting up an XPEnology system, you must first select a DSM platform and version. XPEnology supports a few specific DSM platforms that enable certain hardware and software features. All support a minimum of 4 CPU cores, 64GB of RAM, 10Gbe network cards and 12-disk arrays. When you choose a platform and the desired DSM software version, you must download the correct corresponding loader. That may not be the "newest" loader available. The last 6.x version (6.2.4-25556) is functional only with the TCRP loader. TCRP is very different than the Jun loader. If you want to learn more, or if you are interested in deploying the latest 7.x versions, see the 7.x Loaders and Platforms thread. Be advised that installing 6.2.4 with TCRP is basically the same procedure as installing 7.x. Each of these combinations can be run "baremetal" as a stand-alone operating system OR as a virtual machine within a hypervisor (VMWare ESXi is most popular and best documented, but other hypervisors can be used if desired). Review the table and decision tree below to help you navigate the options. 6.x Loaders and Platforms as of 16-May-2022 Options Ranked DSM Platform DSM Version Loader Boot Methods*** Hardware Transcode Support NVMe Cache Support RAIDF1 Support Oldest CPU Supported Max CPU Threads Notes 1,3a DS918+ 6.2.0 to 6.2.3-25426 Jun 1.04b UEFI, BIOS/CSM Yes Yes No Haswell ** 8 6.2.0, 6.2.3 ok, 6.2.1/6.2.2 not recommended for new installs* 2,3b DS3617xs 6.2.0 to 6.2.3-25426 Jun 1.03b BIOS/CSM only No No Yes any x86-64 16 6.2.0, 6.2.3 ok, 6.2.1/6.2.2 not recommended for new installs* DS3615xs 6.2.0 to 6.2.3-25426 Jun 1.03b BIOS/CSM only No No Yes any x86-64 8 6.2.0, 6.2.3 ok, 6.2.1/6.2.2 not recommended for new installs* DS918+ 6.2.4-25556 TCRP 0.4.6 UEFI, BIOS/CSM Yes Yes No Haswell ** 8 recommend 7.x instead DS3615xs 6.2.4-25556 TCRP 0.4.6 UEFI, BIOS/CSM No No Yes any x86-64 8 recommend 7.x instead DS916+ 6.0.3 to 6.1.7 Jun 1.02b UEFI, BIOS/CSM Yes No No Haswell ** 8 obsolete, use DS918+ instead DS3617xs 6.0.3 to 6.1.6 Jun 1.02b UEFI, BIOS/CSM No No Yes any x86-64 16 6.1.7 may kernel panic on ESXi 4 DS3615xs 6.0.3 to 6.1.7 Jun 1.02b UEFI, BIOS/CSM No No Yes any x86-64 8 best compatibility on 6.1.x * 6.2.1 and 6.2.2 have a unique kernel signature causing issues with most kernel driver modules, including those included in the loader. Hardware compatibility is limited. ** FMA3 instruction support required. All Haswell Core processors or later support it. Only a select few Pentium, and no Celeron CPUs do. ** Piledriver is believed to be the minimum AMD CPU architecture to support the DS916+ and DS918+ DSM platforms. *** If you need an MBR version of the boot loader because your system does not support a modern boot methodology, follow this procedure. CURRENT LOADER/PLATFORM RECOMMENDATIONS/SAMPLE DECISION POINTS: 1. DEFAULT install DS918+ 6.2.3 - also if hardware transcoding or NVMe cache support is desired, or if your system only support UEFI boot Prerequisite: Intel Haswell (aka 4th generation) or newer CPU architecture (or AMD equivalent) Configuration: baremetal loader 1.04b, DSM platform DS918+ version 6.2.3 Compatibility troubleshooting options: extra.lzma or ESXi 2. ALTERNATE install DS3617xs 6.2.3 - if RAIDF1, 16-thread or best SAS support is desired, or your CPU is too old for DS918+ Prerequisite: USB key boot mode must be set to BIOS/CSM/Legacy Boot Configuration: baremetal loader 1.03b, DSM platform DS3617xs version 6.2.3 Compatibility troubleshooting options: extra.lzma, DS3615xs platform, or ESXi 3. ESXi (or other hypervisor) virtual machine install - generally, if hardware is unsupported by DSM but works with a hypervisor Prerequisites: ESXi hardware compatibility, free or full ESXi 6.x or 7.x license Use case examples: virtualize unsupported NIC, virtualize SAS/NVMe disks and present as SATA, run other ESXi VM's instead of Synology VMM Option 3a: 1.04b loader, DSM platform DS918+ version 6.2.3 Option 3b: 1.03b loader, DSM platform DS3617xs version 6.2.3 (VM must be set to BIOS Firmware) Preferred configurations: passthrough SATA controller and disks, and/or configure RDM/RAW disks 4. FALLBACK install DS3615xs 6.1.7 - if you can't get anything else to work Prerequisite: none Configuration: baremetal loader 1.02b, DSM platform DS3615xs version 6.1.7 SPECIAL NOTE for Intel 8th generation+ (Coffee Lake, Comet Lake, Ice Lake, etc.) motherboards with embedded Intel network controllers: Each time Intel releases a new chipset, it updates the PCI id for the embedded NIC. This means there is a driver update required to support it, which may or may not be available with an extra.lzma update. Alternatively, disable the onboard NIC and install a compatible PCIe NIC such as the Intel CT gigabit card.1 point
-
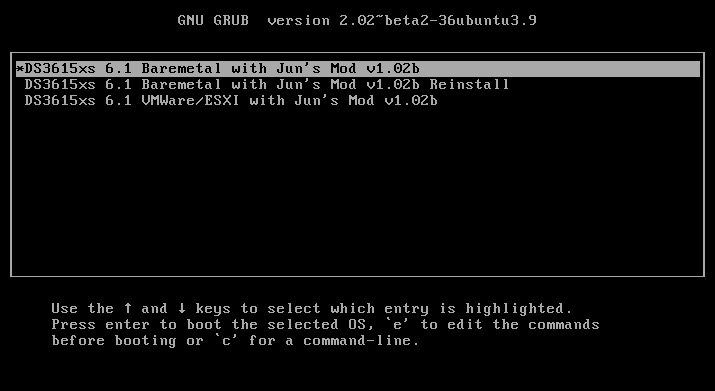
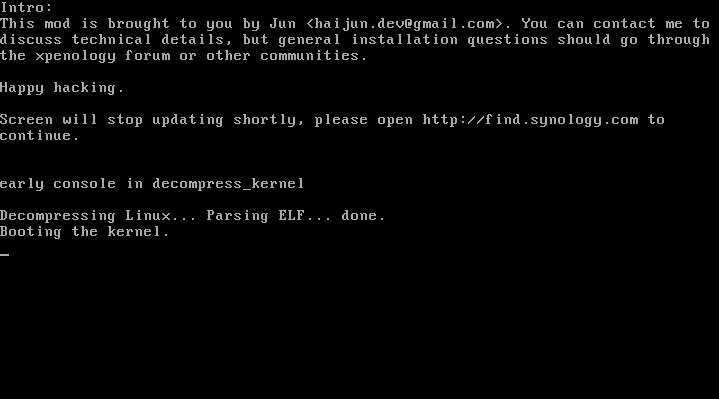
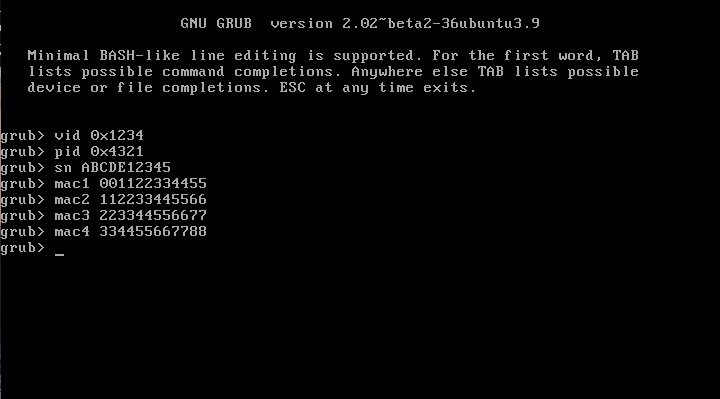
This is an updated tutorial version from the one I made last year. It will enable you to migrate from DSM 5.2 to DSM 6.1.7 directly without the need to upgrade to DSM 6.0.2 first. If for some reason you want to upgrade to DSM 6.0.2 first or simply you do not want to upgrade to DSM 6.1.7 but only to DSM 6.0.2 then use the link above. To upgrade from DSM 6.0.2 to DSM 6.1.7 read here. As most of you know by now Jun was able to find a way to install DSM 6 on non Synology boxes. Here is the thread that I recommend reading. At least make an effort and read the OP: https://xpenology.com/forum/topic/6253-dsm-6xx-loader/ Below is what you need for the operation. I will assume you are doing all this under Windows 10, 8, 7 or XP. If you are on a MAC computer have a look at this post I made on how to burn the image to a USB drive and then mounting the USB drive for editing the content. The rest of the tutorial still applies. If you are currently using DSM 5.1 or below first update to DSM 5.2. If you are doing a fresh install of DSM 6.1 then carry on with the tutorial and omit references to DSM 5.2. - Win32 Disk Imager to make a bootable USB drive; - A 4GB (or any size really) USB drive (flash drive) to install the loader. Not that this is necessary but use preferably a brand name (Kingston, SanDisk...); - A way to read your USB drive VID/PID. Here is a how-to >>> VID and PID; - A good text editor: Notepad++ I really don't recommend using Windows's Notepad; - DSM 6.1.7 PAT file. Chose the one you need: DS3615sx or DS3617sx or DS916+. Download the ".pat" file not the ".pat.md5" - Jun's official v1.02b loader (mirror). This is a hybrid UEFI/BIOS loader so it should work in most machines which are capable or reading GUID partition table (GPT). For older machines that can only read MBR the above loader will simply not boot. If that is your case then use @Genesys's v1.02b loader rebuilt image which is MBR based. Note: Jun's loader supports Intel CPUs. For AMD CPUs Jun has stated that the loader needs some work but it has been reported by many users using HP machines that it actually works. The C1E function in the bios (in some HP machines) needs to be deactivated. I am unsure for other motherboards brands therefore if you have an AMD machine that is not an HP you might be out of luck. Try looking in the bios configuration and play around. - Custom extra.lzma ramdisk. This ramdisk is optional and should only be used if the default ramdisk included in the loader is not detecting your hardware. I am just providing it for those who are having issues with network detection or unrecognised HDD controllers. This custom ramdisk contains additional and updated modules & firmwares. Credits go to @IG-88 for compiling the modules against the latest DSM 6.1.3 source code. I do not warranty they all work but I think most do. If you chose to use this ramdisk, you will need to replace (or rename, so you can revert) the default extra.lzma ramdisk from Jun's loader with this one. If you a have question specific to the custom ramdisk please post it in the topic of IG-88, not here. - If you are doing a fresh install make sure your drives are plugged in direct succession starting from the 1st SATA port. Usually the first port is described as SATA0 on motherboards. Check with your MoBo manufacturer for exact nomenclature. - OSFMount to modify the grub.cfg file within the loader's image and if necessary to replace the extra.lzma ramdisk with the custom one. This is not strictly necessary as Jun has made it possible to configure what needs to be modified via the Grub Boot Menu. If you prefer using Jun's Grub Boot Menu configuration method, simply skip Point 4, read Note 4 instead and pick up at Point 5. PLEASE READ EVERYTHING PRIOR ATTEMPTING ANYTHING Use this loader at your own risk. I wont be held responsible for any loss of data or black smokes that may result in the use of this loader. Please note that this loader has a limited amount of modules (drivers) included. If it is fundamental for you to have a NAS operating as quick as possible I recommend you look at the included drivers very carefully at the bottom of this tutorial before attempting an upgrade. If they are not there you will have to compile your own modules/firmwares or use the custom ramdisk provided above. Don't ask me to compile modules for you. I wont do it. One last thing: DO NOT UPDATE DSM BEYOND VERSION 6.1.7 with loader v1.02b. IN OTHER WORDS DO NOT UPDATE TO DSM 6.2 You have been warned. Here we go: 1 - BACKUP your data and save your configuration prior any attempts to migrate from DMS 5.2 to DSM 6.1. I can't stress this enough. JUST DO IT, as Nike likes to say. Also, print this tutorial if you can. It will make your life easier. 2 - Turn off your NAS and unplug the USB drive you are currently using with DSM 5.2. I recommend you put this USB drive aside in case migration to DSM 6.1 doesn’t go as expected and you need to revert to DSM 5.2. It will just make your life easier. 3 - Now go to your workstation/PC, plug a new USB drive (or the old one if you really don’t have any spare USB drives). Use the link I provided earlier to check your USB drive VID/PID. Write down the info somewhere as we will need it later. 4 - Now launch OSFMount. Select Mount New, then select the image file you downloaded earlier (i.e. .img extension file) to open. Now select partition 0 (the one that is 15 MB). Click Ok. Then at the bottom of the window make sure to un-tick the "Read only drive". Click Ok. The partition should now be mounted in file explorer. At this point you can navigate to the /grub directory and edit the grub.cfg file. If you need to replace the extra.lzma ramdisk with the custom ramdisk provided above then you will also need to mount partition 1 (the one that is 30 MB). Below is what you will see in the grub.cfg file. I am only showing below the portion of the code that is relevant for the purpose of this tutorial [...] set extra_initrd="extra.lzma" set info="info.txt" set vid=0x058f set pid=0x6387 set sn=C7LWN09761 set mac1=0011322CA785 set rootdev=/dev/md0 set netif_num=1 set extra_args_3615='' set common_args_3615='syno_hdd_powerup_seq=0 HddHotplug=0 syno_hw_version=DS3615xs vender_format_version=2 console=ttyS0,115200n8 withefi elevator=elevator quiet' set sata_args='sata_uid=1 sata_pcislot=5 synoboot_satadom=1 DiskIdxMap=0C SataPortMap=1 SasIdxMap=0' set default='0' set timeout='1' set fallback='1' [...] You want to modify the following: Change vid=0x090C to vid=0x[your usb drive vid] Change pid=0x1000 to pid=0x[your usb drive pid] Change sn=C7LWN09761 to sn=generate your sn here with DS3615xs or DS 3617xs or DS916+ model (this will depend on which loader you chose) Change mac1=0011322CA785 to mac1=[your NIC MAC address #1]. You can also add set mac2=[your NIC MAC address #2] and so on until mac4 if you have multiple NICs. However, this is not necessary. Recommended: Change set timeout='1' to set timeout='4' - This will allow you more time to make a selection in the Grub Boot Menu when it appears on screen. Once you are done editing the grub.cfg file, save it and close your text editor. Now in OSFMount click on Dismount all & Exit. You are now ready to burn the image to your USB drive. 5 - Now use Win32 Disk Imager to burn the image file onto the USB drive. This will also make the USB drive bootable. 6 - Eject and unplug the USB drive from your workstation. Plug it in your NAS (avoid USB 3.0 ports. Use USB 2.0 port if available). Boot your NAS and before doing anything fancy, access your BIOS so to make your USB drive the 1st boot drive if it's not the case. The Jun official loader can boot in UEFI or in legacy BIOS, so you chose what suits you best. Also, make sure your HDDs are booting in AHCI mode and not in IDE. Finally, if disabled, also enable the serial port in BIOS. Some BIOS don't have this option so don't get too cranky on this if you can't find it. Save changes to the BIOS and REBOOT the NAS. 7 - Once rebooted, if you have a monitor connected to your NAS you will see the following Grub Boot Menu: ADVICE: even before you see the Grub Boot Menu press the up/down key. This will stop the countdown so you will be able to select the desired line. You won’t see much other than the following after you press enter: If you booted the USB drive in EFI mode then you will see the same text without the last 3 lines but that's ok. 8 - Now go back to your workstation, and launch Synology Assitant or go to http://find.synology.com. Within one minute or so you should normally be able to see your NAS on your local network (it took ~55 seconds on a test I did on a VM). Just follow the instructions and either chose "Install" if you wish to have a clean install or chose “Migration” if you are coming from DMS 5.2 and wish to update while retaining your data. You will be asked to provide the .PAT file you downloaded earlier (DSM_DS3615xs_15217.pat or DSM_DS3617xs_15217.pat or DSM_DS916+_15217.pat). 9 - When the migration is finished you will most probably have to update some of your packages. You can then proceed and update DSM 6.1.7 up to DSM 6.1.7 critical update 3. It is possible you might either need to hard reboot or re-image your usb drive. Make sure to deactivate auto-updates within DSM. Link to individual files (DSM and critical updates) can be found here: https://xpenology.com/forum/topic/7294-links-to-dsm-and-critical-updates/. DO NOT UPDATE TO DSM 6.2. The loader is not compatible. 10 - You are done. If you have questions, first search the forum and/or Google then leave a comment if nothing helps. Please provide your hardware specifications (motherboard model, LAN controller, driver controller etc). Failure to prove such information will lead to the post being deleted or not answered. -------------- Note 1: If after following the tutorial you can’t find your NAS through http://find.synology.com ou Synology Assistant it is highly possible that the drivers of your NIC are not included in the ramdisk of the loader. Make an effort and use Google to know what modules your NIC and HDD controller are using, then check if those modules are included in the custom extra.lzma ramdisk. If yes then use the custom ramdisk. Don't ask me to look for you. If nothing works then ask your question. Note 2: Synology increased security since the introduction of DSM 6. Root access through SSH is no longer possible out of the box. You can however use your admin account and elevate permissions with the following command if you need root permissions: sudo -i Note 3: Please check you have the right VID/PID prior proceeding. If you get the following error ”Failed to install the file. The file is probably corrupted. (13)" it most certainly means your VID and/or PID is/are wrong. If you still have the same error message after verifying the VID/PID then try another USB drive. Note 4: Configuration added to the grub.cfg file can also be done directly during the Grub Boot Menu, so technically you can skip Point 4 and burn the image on the USB drive without editing anything (read Point 5 onward first). If you wish to do the changes from the Grub Boot Menu directly you need to press the letter 'C' when you see the Boot Menu. You will literally only have one second, so be fast. Once you press 'C' you will be in a Grub command line environment. To change your VID enter the following: vid 0xYOUR 4 DIGITS USB DRIVE VID Do the same for pid, sn and mac1. Press enter at each command. The commands are: pid 0xYOUR 4 DIGITS USB DRIVE PID sn YOUR NAS SERIAL NUMBER mac1 YOUR NAS MAC1 ADDRESS If you have multiple NICs you can also issue mac2, mac3 and mac4 as commands. Maximum is mac4. See below: mac2 YOUR NAS MAC2 ADDRESS mac3 YOUR NAS MAC3 ADDRESS mac4 YOUR NAS MAC4 ADDRESS If you think you made a mistake in the numbers simply re-issue the command. When you are done press esc and select the appropriate menu entry. Below is an example (fake numbers) of how it looks under the Grub command line environment : Note 5: If you encounter the error "We've detected errors on your hard drives [drive number] and the SATA ports have also been disabled" during installation, then you have to fallback to adding SataPortMap to the grub environment. Press the letter 'C' at the Grub Boot Menu and then add the following: append SataPortMap=XX where XX is the number of drives. Don’t forget to update this parameter if you add additional drives to your machine. If you use Reinstall, don't forget to re-select the first line of the Boot Menu once the NAS has rebooted after the installation else the Loader will re-select Reinstall and you will be faced with some issues so please beware of this. @@@@@@@@ What does SataPortMap mean? @@@@@@@ @@@@@@@@@@@@@@@@@@@@@@@@@@@@@@@@@ ############## Know issues ##################### - When running on a slow single core machine, there is a race condition that causes the patcher to load too late. The most obvious sign is that console is not working properly. - Some ethernet drivers crash when set MTU above about 4096 (Jumbo frame). ############# Included default modules & firmwares in Jun's Loader ############# ############## Tutorial UPDATES ##################
 1 point
 -
Перед тем как что-то менять в своей работающей системе, настоятельно рекомендуется сделать резервные копии своих особо ценных данных, чтобы потом не жалеть об их безвозвратной потере. Все, что вы творите - это ваш страх и риск, никто не побуждает вас это делать. Самый простой и надежный способ безопасно попробовать - выключить хрень, отключить все диски и загрузочную флешку от действующей системы, взять чистый диск и другую флешку и попробовать установить новую версию загрузчика и системы, если прокатило, то делать уже на действующей системе. 1. Как установить (подготовительные работы описаны для компа с Windows): а) скачать образ загрузчика 1.04b (исходная тема тут), создать каталог в корне диска без символов на кириллице, например, c:/918/ и поместить туда образ загрузчика б) определить VID/PID флешки или картридера в который она вставлена (Панель управления - Диспетчер устройств - Контроллеры USB - Ваша флешка/ридер - Свойства - Сведения - ИД оборудования, нужно для того, чтобы система DSM опознала этот диск и не пыталась устанавливать себя на него, если неправильно определите и пропишите эти параметры, то система будет вылетать по ошибке 13 при установке в) скачать, установить и запустить программу OSFmount, смонтировать Partition 0 (15 Mb) из файла загрузчика, перед монтированием убрать галку Read-only drive г) скачать, установить и запустить программу Akelpad, открыть файл grub/grub.cfg на ранее смонтированном диске, правим, сохраняем: set vid=0xA234 #VID флешки/ридера set pid=0xB678 #PID флешки/ридера set sn=1780PDN123456 #sn set mac1=001132123456 #mac первой сетевой карты set mac1=001132123457 #mac второй сетевой карты, второй и последующий отличаются от первого на +1 в последнем разряде в шестнадцатеричной системе ... set netif_num=2 #количество сетевых карт ... set sata_args='SataPortMap=6' #контроллер sata, значения: 6 - 1 контроллер на 6 портов; 22 - 2 контроллера по 2 порта; 42 - 2 контроллера, первый на 4 порта, второй на 2 и т.п. Где брать sn и mac - ваша головная боль, гугл в помощь, система установится и будет работать с теми, которые изначально прописаны в загрузчике, но с ограничением функционирования некоторых сервисов и модулей, таких как: QC, пуш уведомления, активация кодеков для транскодинга, установка лицензий syno... Но для большинства и без них будет достаточно. На форуме писали, что прокатывало с sn и mac от других реальных моделей syno, но так не пробовал, поэтому утверждать не буду, кто хочет - дерзайте. д) размонтировать диск в OSFmount е) скачать, установить и запустить программу Rufus и записать ранее подготовленный образ на флешку з) вставить флешку в машину, на которой планируете запустить хрень, подключить диски, включить питание ж) отключить брандмауэр в антивирусе, в браузере набрать http://find.synology.com или установить Synology Assistant с сайта syno и найти вновь установленную хрень в вашей сети и) установить DSM установить хрень следуя инструкциям программы установки и приступить к настройке (как это делать здесь не описываю, ибо все ответы есть в базе знаний syno) Для ленивых есть утилита, где собраны основные проги для Windows x64 2. Если хрень не обнаружилась в сети, то скорее всего в загрузчике нет драйверов для ваших сетевых карт и/или для sata контроллеров. a) запустить программу OSFmount, смонтировать Partition 1 (30 Mb) из файла загрузчика, перед монтированием убрать галку Read-only drive б) скачать extra.lzma из этой темы и перезаписать в смонтированном диске в) размонтировать диск и перезаписать образ с добавленными драйверами на флешку г) попробовать запустить и найти хрень в сети, если не получилось, то увы и ах, либо просить, чтобы добавили дрова для ваших устройств в этой теме или самому их добавлять - теория тут 3. Транскодинг (нужны sn и mac от реальной железки) С наибольшей степени вероятности запустиnся на процессорах Intel начиная с 4го поколения (Haswell), но есть нюансы с моделями материнских плат и биосами. Проверяем следующим образом: hardware (hw) транскодинг - в корне системы должен быть каталог /dev/dri с тремя подкаталогами внутри, если его нет, но нет и hw транскодинга, чтобы проверить - ищем каталог в терминале/ssh командой cd /dev/dri. software (sw) транскодинг - должны подняться соответствующие кодеки, проверить можно командой в терминале/ssh cat /usr/syno/etc/codec/activation.conf Если результат такой, то он есть: {"success":true,"activated_codec":["hevc_dec","h264_dec","h264_enc","mpeg4part2_dec","ac3_dec","vc1_dec","vc1_enc","aac_dec","aac_enc","mpeg4part2_enc"],"token":"абракадабра"} Если ничего похожего нет, то нет и транскодинга. P.S. Просьба к админам прибить тему в шапке и дать мне доступ на редактирование первого поста этой темы, буду добавлять по мере поступления вопросов, ибо задолбали оленеводы, которые задают вопросы по установке, во всех подряд темах.1 point
-
You could use your USB stick to host and run your Esxi1 point
-
just a small warning for people trying the 918+ with more then 2 NIC's (more precisely more then 2 network ports) (same goes for 916+ i guess) i had some fun with that as non working drivers and this "new" limit interfered confused me a little (driver working and no ethX) the limit is there for years but not interfered when using the bigger business models that can have additional nic's 918+ has maxlanports="2" in synoinfo.conf (in /etc AND /etc.defaults) the standard for the "normal" 3615/3617 is "8" to get more then two ports working you need to change this or you will and up with only eth0 and eth1 you can change maxlanport to 8 maxlanport="8" and also should add values for ethX_mtu (if i remember correctly they where already up to eth3 - i guess - as there are 2 wifi usb allowed as addition to the two internal) eth4_mtu="1500" eth5_mtu="1500" eth6_mtu="1500" eth7_mtu="1500" you might add wol options but imho not really needed eth2_wol_options="d" eth3_wol_options="d" eth4_wol_options="d" eth5_wol_options="d" eth6_wol_options="d" eth7_wol_options="d" hopefully after sorting this out the extra.lzma will be tested soon1 point


