Leaderboard


Popular Content
Showing content with the highest reputation on 07/09/2017 in all areas
-
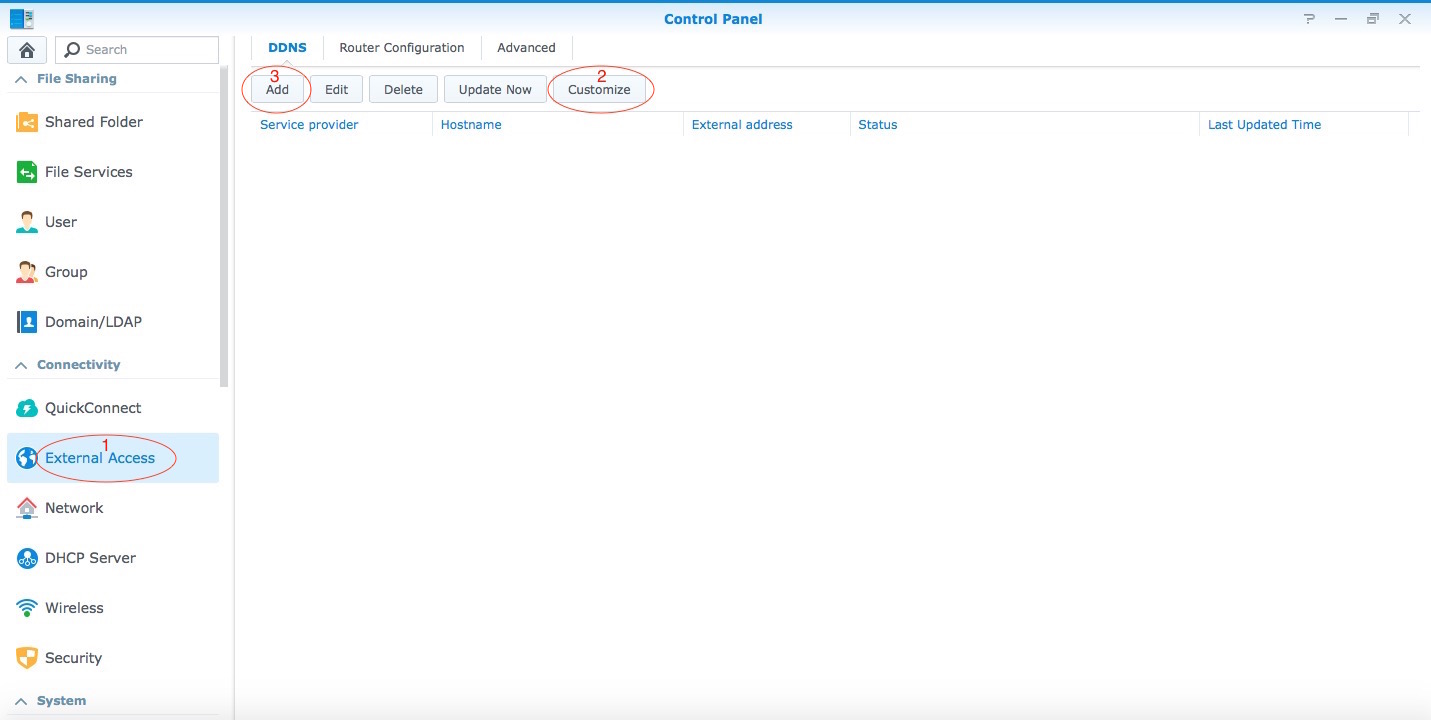
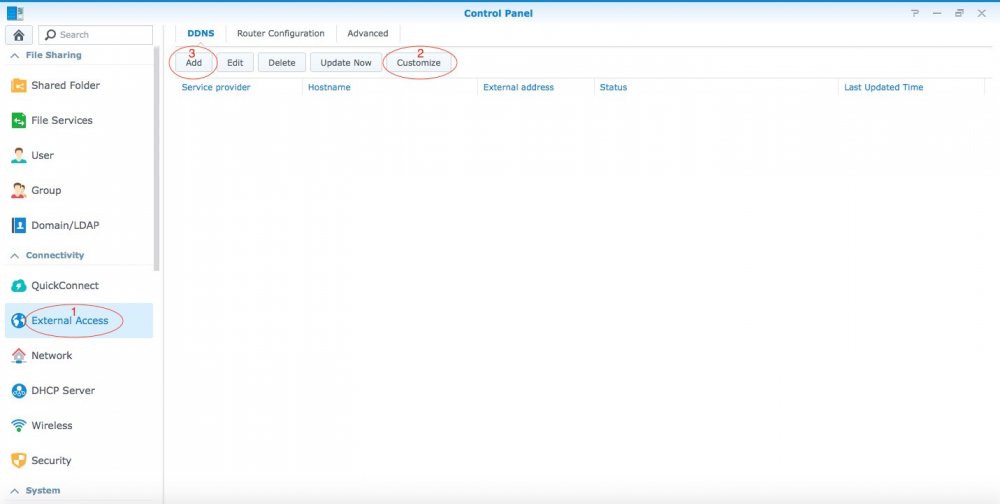
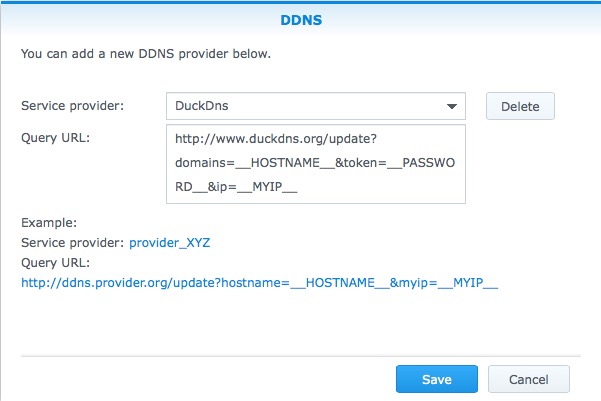
If you have a dynamic IP, you will need to setup a DDNS to access your NAS from outside your local network. So to start thing off you will need to open an account with a DDNS service provider. There are plenty out there, some paid, some free. The two below are the ones that I use personally. They are free. If you find others then you should also be able to use those. Some of these providers might already be part of the list included by Synology in which case you can skip the 'Customize' button and simply use the 'Add' button and select your service provider from there. The configuration example I am giving below will be based on duckdns.org because it's the easiest I have seen out there but unfortunately it is not included in the DDNS service providers list included by Synology so you will need to use the 'Customize' button first. - http://www.duckdns.org - http://www.nsupdate.info Once you have chosen your domain with duckdns.org you will need to configure DSM accordingly. So here is how to: In Control Panel go to External Access (1), then click on Customize (2). A new window should open. You need to fill in as per the image. To save you some time you can copy paste from the code tag provided below the image: http://www.duckdns.org/update?domains=__HOSTNAME__&token=__PASSWORD__&ip=__MYIP__ When you are done click Save. The window should close. Now click on Add (3), see first image. A new window should open. Select *DuckDns from the service provider list and fill in your duckdns domain, username and token: Click on Test Connection to verify that it's working. If it is working you should see the word Normal in green next to Status. You can then click Ok. If it is not working then it means you screwed up somewhere. Recheck query URL, domain, username and token. All that is left to do is to configure port forwarding on your router. This is called at times "port forwarding" or "port mapping". You need to check with your router's user guide as sometimes the wording differs from one brand to the other. The port(s) you will be forwarding to your box also need to be opened on DSM's firewall else DSM will refuse access to the port/service requested. If your ISP implements double NAT you might have to do some additional configuration to your router to allow the ports to be forwarded correctly. Check with your ISP first and also check this site or this site on how to overcome double NAT. Google is your friend. Note of caution here: If you want to make things very safe you would only port forward VPN ports. This means that you can only access your box via VPN which in turn then gives you full access to the box (and to your local network if configured accordingly) once a VPN connection is established. You could also port forward the GUI ports (usually 5000/5001 or the ones you would have customised). This would give you full GUI access to DSM from outside of your network but this can be unsafe specially if you don't have a strong password and proper firewall and safety mechanisms configured in DSM. You could also just forward the port(s)/service(s) that you need. It really all depends what you are using your box for but in most cases the VPN solution is the safest although not the most convenient. NEVER EVER port forward port 22 unless you know exactly what you are doing. To test that your box is accessible from the outside world while being at home you could use your smart phone in data mode (not in wifi) at the following address: http://[yourdomain].duckdns.org:[port number] or https://[yourdomain].duckdns.org:[port number] - Do no put www
 1 point
 -
This link should help : http://www.vm-help.com/esx40i/SATA_RDMs.php I have almost the same setup (DRM + datastore).1 point
-
Your options are to either install on a clean formated hdd and if you need files off other hdd load it up in a Linux live cd and copy over. I will update to version 1.02b over weekend1 point
-
Hello, my first post and I really want to say thank you to all the community I've upgraded with success from 5.2-5967.1 update 3 to 6.1.2-15132 with loader 1.02b esxi 6.0 update 2 on Microserver gen8 with xeon E3 1220L v2 1 ssd for datastore on internal controller and passthrough of a LSi 9211-8i flashed in IT mode with 4 HDDs migration, no clean install and volume repair what I've done: 1) download the image file from first post here (I've used loader 1.02b ds3615) 2) edit settings of your current vm with xpenoboot 5.2 and write down MAC address 3) login to your DSM 5.2 web interface and write down serial number; shutdown the vm 4) download and install OSFmount, then mount the image file downloaded at point 1 (untick "read-only drive"); choose partiton 0 15MB 5) with notepad++ or similar edit grub.cfg with serial and MAC address from point 2 and 3, you can also change the default timeout; I haven't changed anything related to vid and pid 6) download and install StarWind V2V Image converter; convert the image file with modified grub.cfg (choose VWware ESX server image) 7) this will result in 2 files synoboot.wmdk and synoboot-flat.wmdk 8) upload them to the same datastore where you have xpenoboot.wmdk; you can use datastore browser to upload files 9) edit settings of the vm and delete the hard disk pointing to xpenoboot.vmdk virtual disk 10) add new hard disk scsi 0:0 independent non persistent pointing to synoboot.vmdk 11) I haven't added any serial port 12) start the vm and open immediately the console, because you have to select the third entry of the boot menu, the one related to esxi (I wasn't enough quick and needed a vm reset..) 13) open a web browser to find.synology.com 14) connect, install, migrate, manual install with the latest pat file you can download from links here https://xpenology.com/forum/topic/7294-links-to-dsm-and-critical-updates/ 15) in my case the ip was changed, so log in and update it, then update packeges in the package center... backup and replication is now called hyperbackup hope this helps someone bye1 point