Leaderboard


Popular Content
Showing content with the highest reputation since 04/18/2023 in all areas
-
I think I need to explain: Yes, I was a little extreme at the time, because I roughly guessed who that person was. (A brand new account, so to speak, the account created specifically for the purpose of creating that issue) This is what makes me angry. So when he mentioned the open source agreement, I didn't think much about it. Since I can't publish it because the second release under the protocol requires public modification, I delete the repository and don't publish it. If someone else asks, I may not do this, and may even invite him to revise it together. In addition, as we all know, a month ago they were public. I changed it to non-public because 1. I unpacked the official drivers of all architectures and backed them up on github. Although this is nothing, I still don’t want to be retrieved. 2. I saw some very unhappy things( and don’t want to say more, related to the person who created the issue) In addition, and what I said on github, so I won’t go into details here. If anyone thinks I did something, just don't use it. From beginning to end, few people have seen me recommending others to use RR, because it doesn’t do me any good whether you use it or not. On the contrary, the more people use it, the more uneasy I feel. I am always afraid of being targeted by syno officials. But I just have a bit of perfectionism and always want to do better.29 points
-
This is RR’s current status as received from a community user. RR seems to be continuously being updated under the name BLACK SYNOLOGY NAS SYSTEM. However, it appears that it has been converted to domestic use for Chinese people with memberships. He is probably considering access for foreigners if membership is allowed. https://www.123pan.com/s/56Sfjv-1d0WH.html PASSWORD : RRRR Rather, I think that switching to a private membership-only Chinese domestic market can free him from Synology. In any way, I'm just happy that RR's development continues without stopping. https://drive.google.com/file/d/12EinJAx6O9hrjYVAqAtJWc6l5S5l4Vi9/view?usp=drive_link

 14 points
 -
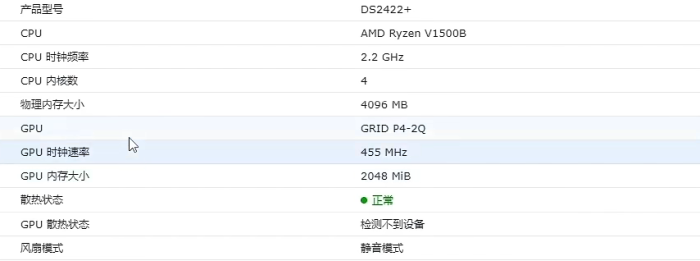
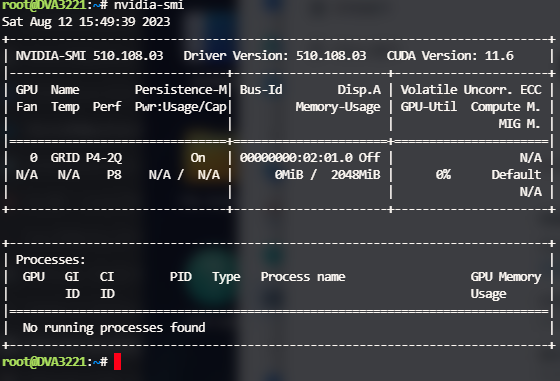
Hello everyone, my name is pdbear. Recently, I've been exploring the setup of media servers like Emby, Plex, Jellyfin, etc., within Synology NAS. I noticed that the lack of GPU transcoding functionality was something missing. As a vGPU user, I took some time to adapt it accordingly. Currently, the driver is based on 510.108.03, and it supports almost all x86 Synology NAS with kernel 4.4.302+. Feel free to give it a try. github link: https://github.com/pdbear/syno_nvidia_gpu_driver
 10 points
 -
Hello everyone, I've managed to compile the up-to-date out-of-tree i915 kernel module for sa6400, with support for up to 14th gen (Raptor Lake) Intel GPU in theory. I've verified jellyfin HW transcoding on my N100 box (12th gen, Alder Lake), in both PCIe passthrough and SR-IOV VF mode. The source code is available at https://github.com/MoetaYuko/intel-gpu-i915-backports/tree/redhat/main-epyc7002, which can be built on the cloud w/ github actions. You can find the precompiled blobs from github actions artifacts of this repo. The driver is considered alpha quality because I haven't used it long. Feel free to try it and report issues here if any. In case of missing firmware, you'll see error messages w/ the desired FW filename in dmesg. They can be downloaded at https://github.com/intel-gpu/intel-gpu-firmware and put in `/lib/firmware/i915` of your DSM. For SR-IOV with PVE hypervisor, I highly recommend using the dkms driver published at https://github.com/MoetaYuko/intel-gpu-i915-backports/releases (its source code is available at `backport/main` branch of the same repo). It has three major advantages over the popular host driver from https://github.com/strongtz/i915-sriov-dkms: Its Intel release tag is the same as my sa6400 driver, so the best compatibility is ensured. It's packaged as .deb so it can be easily installed and upgraded via apt/dpkg. The .ko binaries reside in `/lib/modules/$(uname -r)/updates/dkms` so they won't override the ones provided by the proxmox-kernel package.10 points
-
As others already said, please don't. Don't listen to some garbage users... Your work is really appreciated and very usefull for all of us. Please just ignore these few as**oles... There are 99% silent users very grateful of your work.10 points
-
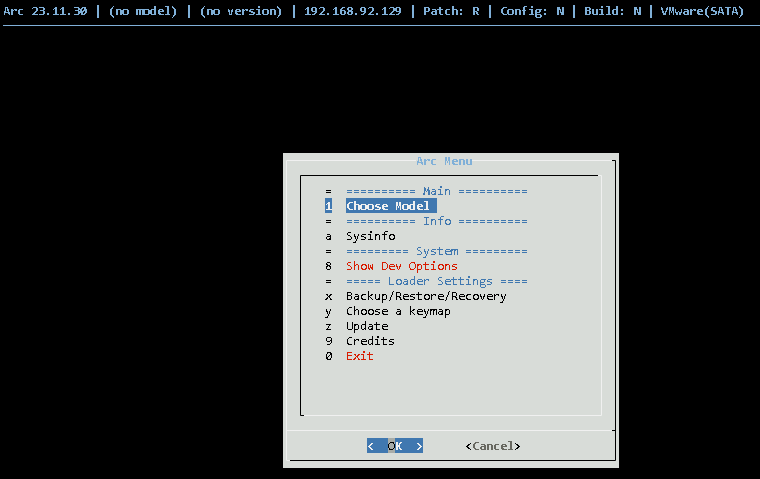
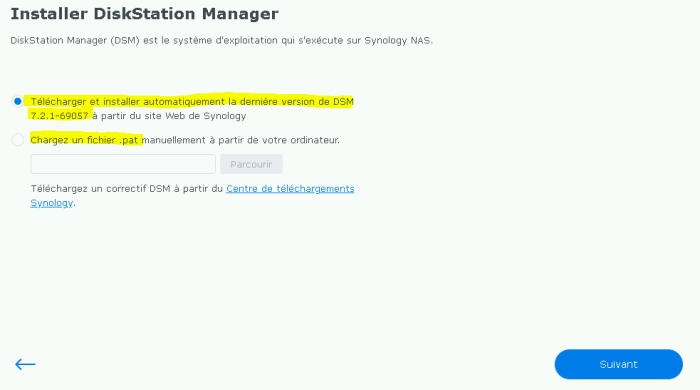
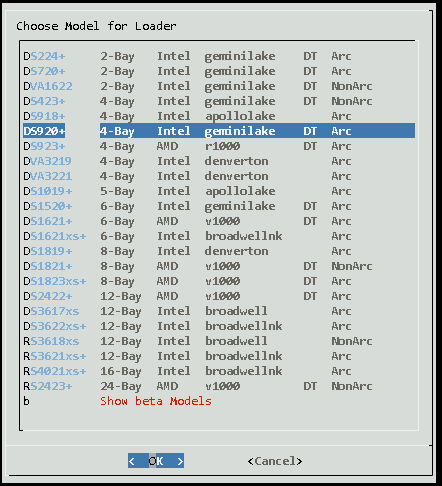
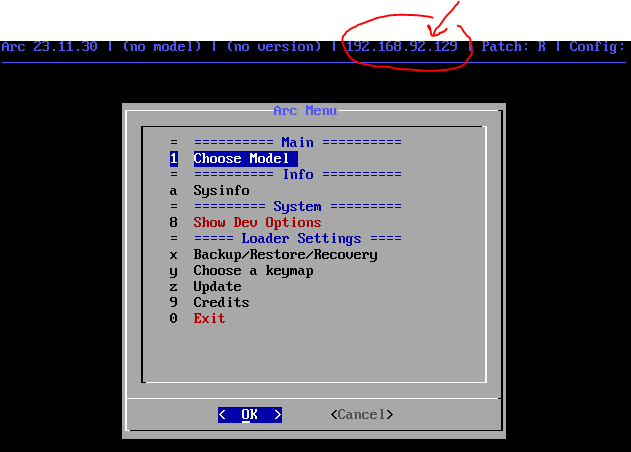
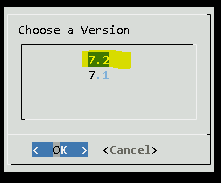
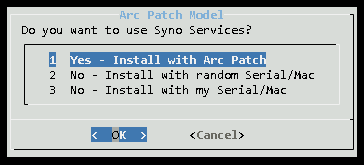
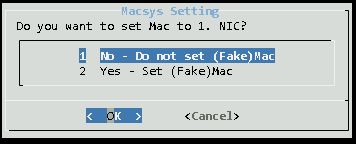
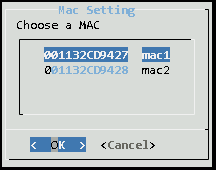
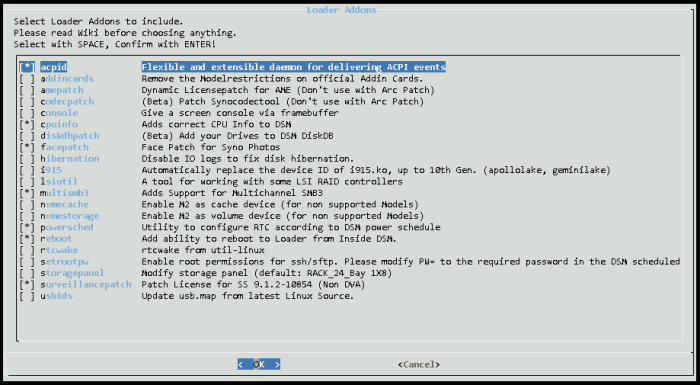
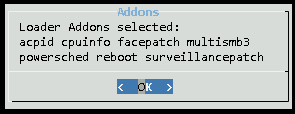
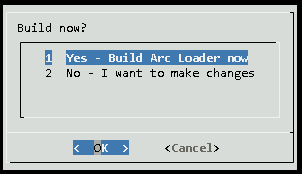
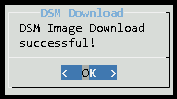
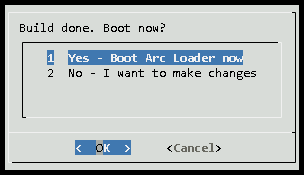
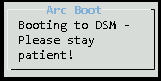
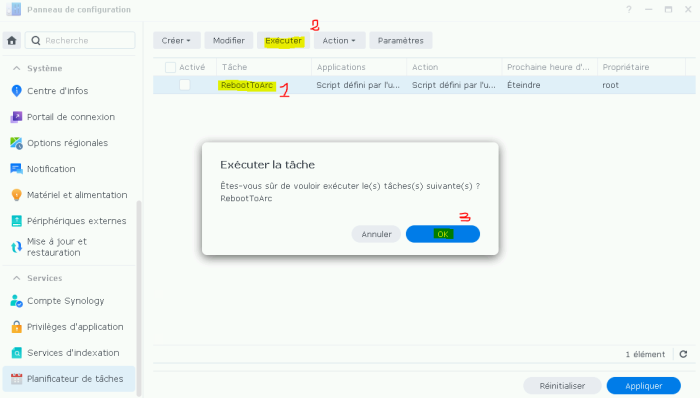
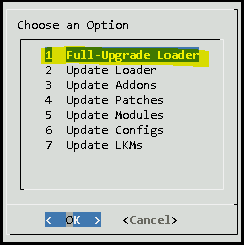
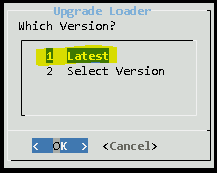
[EDIT du 01/12/2023] refonte du tuto pour utilise le loader arc à la place de arpl/rr [EDIT du 28/11/2023] fin du repo GitHub et fin de support des mises à jour [EDIT du 28/11/2023] support proxy [EDIT du 17/11/2023] adaptation refonte du loader rr Bonjour à tous, Voici une procédure permettant d'installer DSM 7 sur votre matos avec le loader ARC : >> Enorme bravo à toute la team pour leur travail régulier << Pré-requis : Un service DHCP doit être actif sur votre réseau, Lors de la construction du loader, le serveur doit avoir accès à Internet (pour utiliser un proxy, il faut quitter le menu, et en ligne de commande faire export https_proxy=http://proxy_host:proxy_port/), Une clé USB récente d'au moins 8Go et USB 3 si possible Configurer correctement votre BIOS selon les recommandations suivantes : https://github.com/AuxXxilium/AuxXxilium/wiki/Settings:-Bios-&-UEFI 1. Création de la clé USB Bootable : Télécharger puis décompresser le fichier arc-YY.MM.version.img.zip. Pour ESXi prenez la version estampillée arc-YY.MM.vv.vmdk-flat.zip Dézipper-le avec 7zip par exemple et à l'aide de l'outil BalenaEtcher "graver" le fichier .img correspondant sur votre clé USB. 2. Connecter la clé USB au serveur et booter dessus pour démarrer sur le loader (assurez-vous que le BIOS soit configuré pour booter sur l'USB) 3. Attendez que l'écran affiche l'adresse IP et le n° de port attribué par votre serveur DHCP. 4. A partir d'un autre PC (c'est aussi possible de le faire depuis le NAS directement, mais moins convivial) saisir l'url affichée dans votre navigateur web (ou scanner le QR code avec votre téléphone si vous à l'aise avec votre smartphone), par exemple : http://192.168.92.129:7681 5. [Choose Model for Loader] : Cliquer "Choose Model" et choisir le modèle de votre choix. Conseil : renseignez-vous bien en amont sur celui-qui correspond à vos besoins et l'architecture de votre CPU. Perso je recommande soit le DS3622XS, soit le DS920+, soit le DVA1622 pour disposer de 8 licences Surveillance Station. Pour vous aidez cette rubrique du wiki est très détaillée. 6. [Version] Sélectionner la version de DSM, par exemple 7.2 et patienter le temps que le script analyse les options possibles avec le modèle choisi 7. [Arc Patch Model] Je vous laisse le soin de décider qu'elle option vous souhaitez. Si vous avez un vrai couple Serial/Mac évidement c'est la meilleur option, sinon et si seulement l'option apparait en fonction du modèle choisi alors vous pouvez tenter d'activer l'arc Patch à vos risques périls. 8. [Mac Setting] Choisir l'adresse MAC qui sera mappée sur votre carte réseau (encore une fois ça dépend du modèle). Sauf indication contraire, je vous conseille la 1ère! 9. [Macsys Setting] Choisir si vous souhaitez affecter l'adresse mac du Syno à l'interface physique de votre serveur. Il n'y a pas de bonne ou mauvaise réponse. Essayer la 1ère par défaut et si après la fin du tuto le NAS n'est pas visible, tenter l'autre option. 10. [Loader Addons] Sélectionner les addons dont vous avez besoin en plus de ceux par défaut selon vos besoins puis accepter la confirmation. Par exemple, chez moi j'utilise ceux là : --> 11. [Build now ?] Lancer la construction du loader : Note : si vous souhaitez ajuster d'autres options comme des modules ou activer le direct boot, sélectionner No - I want to make changes et naviguer dans les options du menu principal. -->--> 12. [Build done] Lancer le démarrage du loader --> Le NAS va rebooter sur loader, patienter jusqu'au démarrage de DSM (vérifier que les LED de la carte réseau clignotent) 13. Soit depuis Syno Assistant, soit en regardant l'IP attribuée, ouvrir l'url : http://192.168.92.129:5000, vous devriez voir la page de configuration de DSM 14. Suivre la configuration de DSM de manière standard. Vous pouvez télécharger le fichier pat en amont et le sélectionner ou laisser DSM le faire pour vous mais dans ce cas précis vérifier bien la version de DSM avec la version du loader arpl pour qu'elle soit compatible entre elle. --> --> [...] 15. Enjoy ################################################################### ################# FAIRE UNE MISE A JOUR ###################### ################################################################### 1. Depuis DSM, dans le panneau de configuration > Planificateur de tâches : exécuter la tâche RebootToArc Patienter le temps du reboot... 2. Une fois le loader rechargé, rendez-vous sur la page initiale de configuration : http://192.168.92.129:7681 et sélectionner le menu Update : 3. Ne vous prenez pas la tête, sélectionner l'option Full-Upgrade Loader : ->-> Astuce : Le loader permet un mécanisme de rollback à l'aide d'un code, conserver le au cas-où! 4. Patientez le temps du téléchargement de la nouvelle version du loader. A la fin vous devriez avoir un message de confirmation. Cliquer sur Yes pour confirmer le reboot. 5. Après le reboot, vous devriez voir la dernière version du loader s'afficher en haut à gauche (après rafraichissement forcé (CTRL+F5) de la page http://192.168.92.129:7681) 6. Reprendre le tuto comme si c'était une installation normale! Changer la version de DSM évidement et lors de la mise à jour sélectionner le fichier pat correspondant ou laisser DSM choisir pour vous si vous être sûr de la compatibilité entre le loader et DSM.


 8 points
 -
Well calm down, we are lucky to have alternatives. @Peter Suh and @pocopico are doing a great job too, and it is a good thing to not have only one choice. I also really like ARPL like loaders, but I really appreciate their effort with TCRP (M-shell) I also test it quite often to see the progress done with it.8 points
-
есть такое решение, делал по инструкции ниже. поменял у себя для 920+ картинку от rack_12: все кликабельно и отображается. Изменение отображение NASа в Диспетчере хранения DSM 7.* - скачать файл /usr/syno/synoman/webman/modules/StorageManager/storage_panel.js.gz (например WinSCP) - открыть при помощи 7zip - отредактировать storage_panel.js. Перенести кодовое имя своего NASа в нужный раздел. (На примере у меня "synology_apollolake_918+" из TOWER_4_Bay в TOWER_8_Bay) Вот возможные варианты: RACK_0_Bay, RACK_2_Bay, RACK_4_Bay, RACK_8_Bay, RACK_10_Bay, RACK_12_Bay, RACK_12_Bay_2, RACK_16_Bay, RACK_20_Bay, RACK_24_Bay, RACK_60_Bay, TOWER_1_Bay, TOWER_2_Bay, TOWER_4_Bay, TOWER_4_Bay_J, TOWER_4_Bay_S, TOWER_5_Bay, TOWER_6_Bay, TOWER_8_Bay, TOWER_12_Bay - зайти через ssh (Putty) - ввести chmod 0777 /usr/syno/synoman/webman/modules/StorageManager/storage_panel.js.gz - загрузить файл на измененный - ввести chmod 0644 /usr/syno/synoman/webman/modules/StorageManager/storage_panel.js.gz - почистить кэш браузера8 points
-
We very much appreciate your work and hope you'll change your mind. All the best.7 points
-
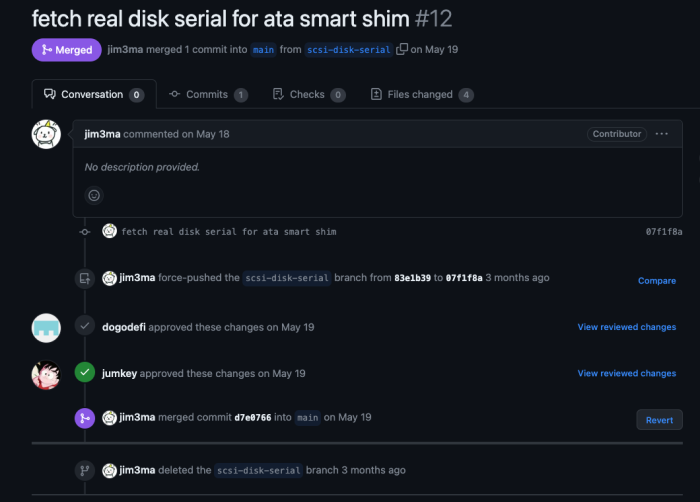
[NOTICE] Now, when using DS918+ and HBA in REDPILL, the hard drive serial number is displayed. I've been hanging here all day today, and for the first time in a while, I'm bringing you some good news. It seems that DS918+ (apollolake) will now rise again to the level of the most perfect model. Transcoding, HBA everything is perfect. This makes it the only model that supports these two conditions. Until now, there has been a problem with not being able to distribute the serial number, which is the S.M.A.R.T information of the hard disk, when using it with HBA. There was a fatal problem that made it difficult to replace the hard drive when using it in raid mode. Today, the source of lkm5 for Kernel 5 developed for SA6400 was developed targeting Kernel 5, but various improvements were seen. https://github.com/XPEnology-Community/redpill-lkm5 I imported only the improved parts of the existing lkm source for Kernel 4 and compiled it. A new source that stands out is scsi_disk_serial.c / scsi_disk_serial.h. I could smell it just by looking at the name, so I brought it right away. lol scsi corresponds to the hba device and means the serial source of the disk. https://github.com/PeterSuh-Q3/redpill-lkm/blob/master/shim/storage/scsi_disk_serial.c Many experts came together to solve this problem in order to improve this source. Development was completed 3 months ago, but it seems no one has thought to apply it to Kernel 4.^^ Currently only applied to M-SHELL. I will spread this information separately to ARPL developers. As always, you will need to rebuild your loader. The lkm version that must be updated to the new version during the build process is 23.5.8. https://github.com/PeterSuh-Q3/redpill-lkm/releases/tag/23.5.8 @wjz304 Please see my lkm linked. I think you can consider the sources modified today as the target for syncing. Please try it and contact us if you have any problems. https://github.com/PeterSuh-Q3/redpill-lkm
 7 points
 -
The general idea is that we do not ditribute copyrighted material in ANY WAY ! We do that for the fun of it and thats it. I personaly respect the work of Syno, i own a Syno device and i enjoy using it. I always suggest for production purposes to go and buy the real thing and support the developers and the company. Thats one of the reasons why i will never put a license crack/bypass to the loader (although this would be fun). If someone needs more that 8 licenses for surveilance that problably means he has enough money to go and buy / support the company.7 points
-
Virtual DSM in Docker I noticed that installing XPEnology was really complicated, so I decided to create an alternative: a docker container of Virtual DSM 7. Advantages No bootloader required No PID/VID/MAC required Updates are fully working Light-weight, only 101 MB in size Uses high-performance KVM acceleration just like Synology VMM Completely legal, all installation files are downloaded from Synology servers It would be nice to get some feedback, so please download it at https://hub.docker.com/r/vdsm/virtual-dsm and let me know what you think! If you want to participate in development or report some issues, the source code is available at https://github.com/vdsm/virtual-dsm to see.6 points
-
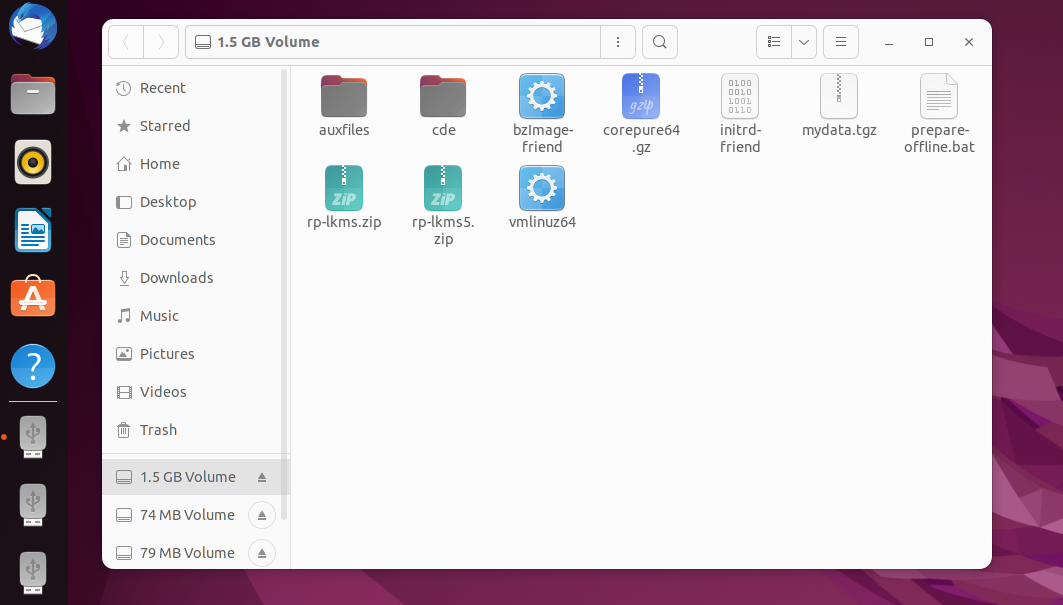
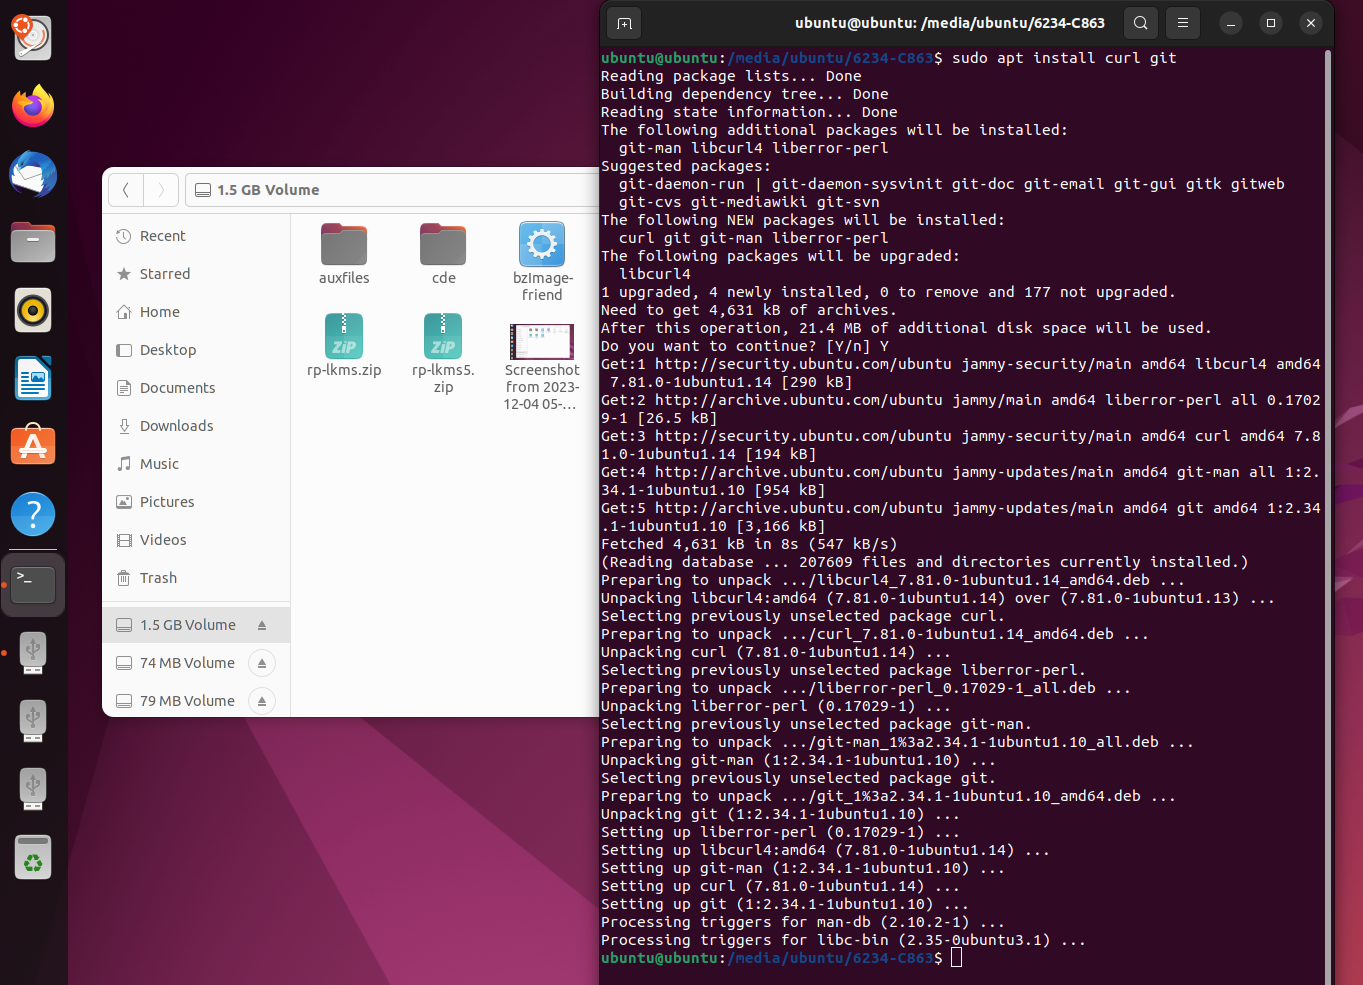
[NOTICE] v1.0.0.5 Add offline loader build function https://github.com/PeterSuh-Q3/tinycore-redpill/releases/tag/v1.0.0.5 [ Mount the third USB partition in Linux-Ubuntu Try and prepare to pre-download the Github module for offline loader building ] 1. Select USB Media 1.5 GB Volume from the left activity bar and open the folder. 2. Right-click inside the 1.5 GB Volume folder, select “Open In Termial” menu, and open terminal. Make sure you stay in the path "/media/ubuntu/6234-C863" 3. Install curl and git sudo apt install curl git 4. Execute curl download command (git clone script included in bat file) curl -kLO https://raw.githubusercontent.com/PeterSuh-Q3/tinycore-redpill/main/prepare-offline.bat ./prepare-offline.bat 5. Access Synology Download Center and download pat file https://www.synology.com/en-us/support/download Change the file name of the download folder (remove DSM_, change all other English letters to lowercase, + to p) DSM_SA6400_69057.pat -> sa6400_69057.pat DSM_DS920+_69057.pat -> ds920p_69057.pat Copy the renamed pat file into the auxfiles folder created above.6 points
-
wjz304 is doing god's work but toxic people ruining devs' hardwork is so common and I hate seeing this again. With fbelavenuto taking a long break it made me fear if the same thing happened to him as well. (not saying it happened, just something that came to my mind) Please ignore the toxic people and keep doing what you're passionate with.(请无视毒瘤,做你喜爱做的事就好) If you're having trouble dealing with toxic people, the community is always at your back.6 points
-
arpl-i18n (or recently rr) was such an awesome project. Can't believe we lost it... if there's any kind of hope for @wjz304 to revert the decision... please, please, reconsider your decision... What a massive loss Even if the decision is final, just want to share my best wishes for you @wjz304. you will be greatly missed...6 points
-
https://wdfiles.ru/1s5uc/rr-23.11.10.img.zip https://wdfiles.ru/1s5u8/rr_4GB-23.11.10.img.zip All versions that I have in one archive. https://dropmefiles.com/7lX8m6 points
-
Here is the latest AME patch for version 1.1.0-51005 I'm replicating Wangsiji's work. enjoy. codecpatch.sh amepatch.py
 6 points
 -
- Outcome of the update: SUCCESSFUL - DSM version prior update: DSM 7.1.1-42962 Update 5 - Loader version and model: TinyCore RedPill v0.9.4.6 with Friend - DS918+ - Using custom extra.lzma: NO - Installation type: Baremetal - Additional comments: * Manually install 7.2 * reboot, wait for "synology is recoverable" * Shutdown * Rebuild usb key with TCRP 0.9.4.6 * ./rploader.sh update now * ./rploader.sh fullupgrade now * ./rploader.sh serialgen DS918+ realmac * ./rploader.sh identifyusb now * ./rploader.sh satamap now * ./rploader.sh backup * ./rploader.sh build ds918p-7.2.0-64561 withfriend * ./rploader.sh backup * exitcheck.sh reboot6 points
-
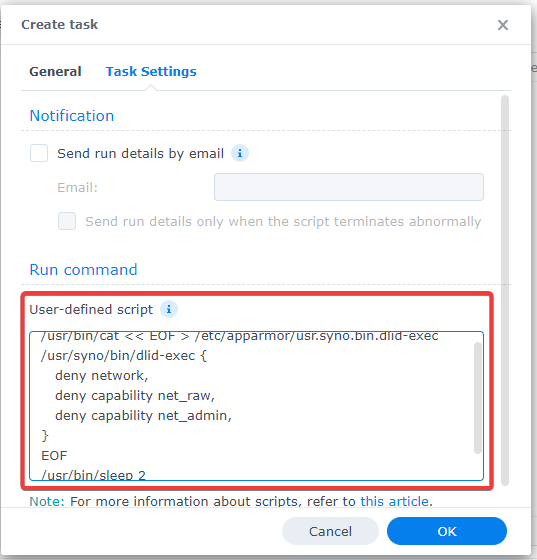
So for 7.2RC : /usr/bin/cat << EOF > /etc/apparmor/usr.syno.bin.dlid /usr/syno/bin/dlid { deny network, deny capability net_raw, deny capability net_admin, } EOF /usr/bin/sleep 2 /sbin/apparmor_parser -r /etc/apparmor/usr.syno.bin.dlid /bin/rm -f /usr/syno/etc/dlid.status
 6 points
 -
Hello everyone, I would like to share a personal project that I am developing. It is another loader for TTG Redpill, intended to be as automatic and user-friendly as possible. The link is below, download the image and record it on a flash drive, the rest is done on the same computer. I'm Brazilian and I'm not good at English language, so forgive me for translation errors. I used forum knowledge and code from various loaders developed by TTG, pocopico, jumkey, Jun and many others. Hope you like it. https://github.com/fbelavenuto/arpl Edit: An important information that I forgot to mention is that I developed a simple patch to no longer display the DUMMY port error on models without device-tree, the user will be able to install without having to worry about it5 points
-
Before installing XPEnology using DSM 7.x, you must select a DSM platform and loader. XPEnology supports a variety of platforms that enable specific hardware and software features. All platforms support a minimum of 4 CPU cores, 64GB of RAM, 10Gbe network cards and 16 drives. Each can run "baremetal" as a stand-alone operating system OR as a virtual machine within a hypervisor. A few specific platforms are preferred for typical installs. Review the table and decision tree below to help you navigate the options. NOTE: DSM 6.x is still a viable system and is the best option for certain types of hardware. See this link for more information. DSM 7.x LOADERS ARE DIFFERENT: A loader allows DSM to install and run on non-Synology hardware. The loaders for DSM 5.x/6.x were monolithic; i.e. a single loader image was applicable to all installs. With DSM 7.x, a custom loader must be created for each DSM install. TinyCore RedPill (TCRP) is currently the most developed tool for building 7.x loaders. TCRP installs with two step-process. First, a Linux OS (TinyCore) boots and evaluates your hardware configuration. Then, an individualized loader (RedPill) is built and written to the loader device. After that, you can switch between starting DSM with RedPill, and booting back into TinyCore to adjust and rebuild as needed. TCRP's Linux boot image (indicated by the version; i.e. 0.8) changes only when a new DSM platform or version is introduced. However, you can and should update TCRP itself prior to each loader build, adding fixes, driver updates and new features contributed by many different developers. Because of this ongoing community development, TCRP capabilities change rapidly. Please post new or divergent results when encountered, so that this table may be updated. 7.x Loaders and Platforms as of 06-June-2022 Options Ranked 1a 1b 2a 2b 2c 3a 3b DSM Platform DS918+ DS3622xs+ DS920+ DS1621+ DS3617xs DVA3221 DS3615xs Architecture apollolake broadwellnk geminilake v1000 broadwell denverton bromolow DSM Versions 7.0.1-7.1.0-42661 7.0.1-7.1.0-42661 7.0.1-7.1.0-42661 7.0.1-7.1.0-42661 7.0.1-7.1.0-42661 7.0.1-7.1.0-42661 7.0.1-7.1.0-42661 Loader TCRP 0.8 TCRP 0.8 TCRP 0.8 TCRP 0.8 TCRP 0.8 TCRP 0.8 TCRP 0.8 Drive Slot Mapping sataportmap/ diskidxmap sataportmap/ diskidxmap device tree device tree sataportmap/ diskidxmap sataportmap/ diskidxmap sataportmap/ diskidxmap QuickSync Transcoding Yes No Yes No No No No NVMe Cache Support Yes Yes Yes Yes Yes (as of 7.0) Yes No RAIDF1 Support No Yes No No Yes No Yes Oldest CPU Supported Haswell * any x86-64 Haswell ** any x86-64 any x86-64 Haswell * any x86-64 Max CPU Threads 8 24 8 16 24 (as of 7.0) 16 16 Key Note currently best for most users best for very large installs see slot mapping topic below AMD Ryzen, see slot mapping topic obsolete use DS3622xs+ AI/Deep Learning nVIDIA GPU obsolete use DS3622xs+ * FMA3 instruction support required. All Haswell Core processors or later support it. Very few Pentiums/Celerons do (J-series CPUs are a notable exception). Piledriver is believed to be the minimum AMD CPU architecture equivalent to Intel Haswell. ** Based on history, DS920+ should require Haswell. There is anecdotal evidence gradually emerging that DS920+ will run on x86-64 hardware. NOT ALL HARDWARE IS SUITABLE: DSM 7 has a new requirement for the initial installation. If drive hotplug is supported by the motherboard or controller, all AHCI SATA ports visible to DSM must either be configured for hotplug or have an attached drive during initial install. Additionally, if the motherboard or controller chipset supports more ports than are physically implemented, DSM installation will fail unless they are mapped out of visibility. On some hardware, it may be impossible to install (particularly on baremetal) while retaining access to the physical ports. The installation tutorial has more detail on the causes of this problem, and possible workarounds. DRIVE SLOT MAPPING CONSIDERATIONS: On most platforms, DSM evaluates the boot-time Linux parameters SataPortMap and DiskIdxMap to map drive slots from disk controllers to a usable range for DSM. Much has been written about how to set up these parameters. TCRP's satamap command determines appropriate values based on the system state during the loader build. It is also simple to manually edit the configuration file if your hardware is unique or misidentified by the tool. On the DS920+ and DS1621+ platforms, DSM uses a Device Tree to identify the hardware and ignores SataPortMap and DiskIdxMap. The device tree hardcodes the SATA controller PCI devices and drive slots (and also NVMe slots and USB ports) prior to DSM installation. Therefore, an explicit device tree that matches your hardware must be configured and stored within the loader image. TCRP automatic device tree configuration is limited. For example, any disk ports left unpopulated at loader build time will not be accessible later. VMware ESXi is not currently supported. Host bus adapters (SCSI, SAS, or SATA RAID in IT mode) are not currently supported. Manually determining correct values and updating the device tree is complex. Device Tree support is being worked on and will improve, but presently you will generally be better served by choosing platforms that support SataPortMap and DiskIdxMap (see Tier 1 below). CURRENT PLATFORM RECOMMENDATIONS AND DECISION TREE: VIRTUALIZATION: All the supported platforms can be run as a virtual machine within a hypervisor. Some use case examples: virtualize unsupported network card virtualize SAS/NVMe storage and present to DSM as SATA run other VMs in parallel on the same hardware (as an alternative to Synology VMM) share 10GBe network card with other non-XPEnology VMs testing and rollback of updates Prerequisites: ESXi (requires a paid or free license) or open-source hypervisor (QEMU, Proxmox, XenServer). Hyper-V is NOT supported. Preferred Configurations: passthrough SATA controller and disks, and/or configure RDM/RAW disks This post will be updated as more documentation is available for the various TCRP implementations.5 points
-
Oh! Well, yes, you can ask me only here! 🤣 A brief history of bootloaders for DSM 7 (in my understanding I'm sorry if I make a mistake somewhere) TCRP by @pocopico | +---> ARPL by @fbelavenuto, It is no longer developing) ==> arpl-i18n renamed to ==> arpl-rr by @wjz304, due to some disagreements, the project is developing with some limitations, but it works | +---> M Shell for TCRP by @Peter Suh | +---> Arc Loader by Christian, who could not be identified on this forum (?) I would like to take this opportunity to express my deep gratitude to all the listed authors for their hard work!5 points
-
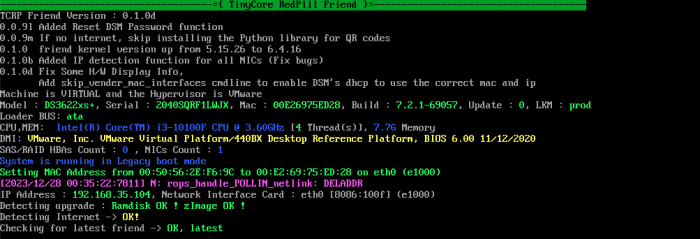
[NOTICE] Deploy virtual MAC address spoofing Addon mac-spoof This does not apply to users who only use real MAC addresses. Currently, the FRIEND kernel shows the process of spoofing a real MAC address with a virtual MAC address using a yellow message. So, when MAC spoofing processing is completed, a new DHCP IP address is assigned to the newly changed virtual MAC address. During this process, the spoofing status must continue to be transmitted at the Junior stage of installing DSM and at the OS_ON_LOAD point when DSM installation is completed and the OS is loaded. However, there are cases where this spoofing is released and a strange state where neither real MAC nor virtual MAC persists. (In the DSM control panel, the real MAC is displayed, but the IP already assigned to the virtual MAC is used, etc.) So, even within DSM, ADDON, which fixes explicit MAC spoofing, was added to MSHELL. To use this addon, you must re-enter the mshell TCRP loader build menu and build again. The command below on the right is a way to re-check whether the mac-spoof addon is properly installed. The green message is the process of spoofing from the real MAC address to the virtual MAC address. For this spoofed virtual MAC address, an IP address of 192.168.35.104 was assigned by the DHCP server (router). In Junior mode where DSM is installed, the mac-spoof addon runs and the IP is well fixed through virtual MAC spoofing. MAC spoofing in Junior mode ensures that the virtual MAC address is checked on the DSM control panel even after OS_ON_LOAD, when DSM installation is completed.

 5 points
 -
Today I researched how to spoof Mac address in Mshell. Although spoofing was already successful on Friend, there was an issue where it could not continue to DSM. Mac spoofing was handled within DSM with the command below. I confirmed that the Mac and IP addresses were renewed normally. sudo -i /sbin/ip link set dev eth0 address 00:E2:69:75:ED:28 /etc/rc.network restart I plan to inject this script in the form of a new addon. I decided to name it force_dhcp. I will announce this feature when it is released.5 points
-
I'm very sad because of this, he is the only dev that kept dsm 6.2.4 alive and it is also very frustrating thinking that maybe some other dev is involved in this situation. (He did said that someone wanted the source of the drivers he had). It really saddens me. But he deserves a break and hope he will be back someday. Thank you for your amazing work.5 points
-
I do not rule out sabotage or something else He was really creative 😔5 points
-
Don't pay too much attention to what they say It's a fantastic project and it's helping a lot of people. I hope you change your mind.5 points
-
ARC is an ARPL Fork 100%, i'm not following AUX. On the other hand, WJZ304 , has been very helpful with 7.2 and LKM compilation issues, If i was to get away from TCRP i think https://github.com/wjz304/arpl-i18n would be my cup of tea.5 points
-
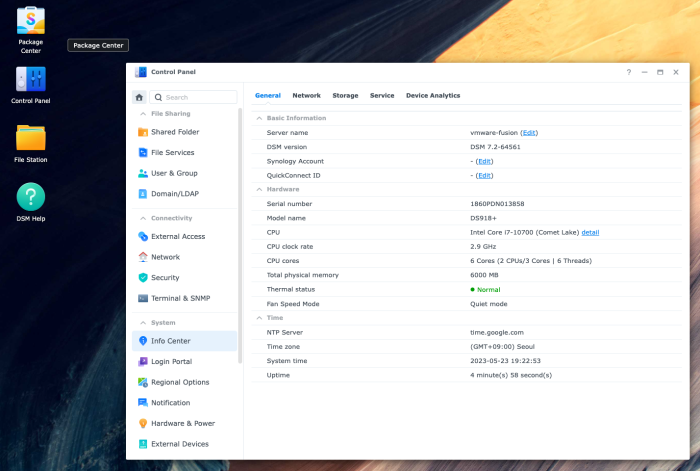
[NOTICE] Supports M Shell for TCRP , DSM 7.2-64561 official version. https://github.com/PeterSuh-Q3/tinycore-redpill/releases/tag/v0.9.4.3-2 If you enter the TCRP Loader Build menu, automatic updates will proceed as before. The menu has 7.2-64561 instead of 7.2-64551 RC. If today's update history appears during automatic update, it is a good change. # Update : Add Support DSM 7.2-64561 Official Version # 2023.05.23
 5 points
 -
[NOTICE] TCRP-mshell version 1.0.1.0 update notice (Tinycore 12.0 -> 14.0 upgrade) The purpose of this update is to load mshell's Tinycore img image or vmdk and boot. To further increase module compatibility with new devices in Tinycore Linux, where the first four windows appear, I updated from the old version 12.0 to the final version 14.0, released in January of this year. When you enter the Loader Build menu, mshell will handle automatic installation and restart. If there is a problem where the i226-v LAN card is not supported by the old version 12.0 IGC module, automatic update will not be possible. If you use a separate LAN card, automatic update is possible, but if not, Please burn the image below, which has already been updated to 14.0 in advance, back to USB or mount it on the virtual system. https://github.com/PeterSuh-Q3/tinycore-redpill/releases/tag/v1.0.1.0
 4 points
 -
[NOTICE] TCRP FRIEND v0.1.0 version upgrade (kernel 5 -> kernel 6 update) The last kernel version of rr was 6.4.16. The existing friend's kernel was staying at 5.15.26. In this version 0.1.0, the kernel has been upgraded to version 6.4.16, which is the same as rr. The purpose of kernel version upgrade is to increase module compatibility with new devices. First of all, the first target is the i226-v chipset using the igc module. To upgrade kernel 6 from kernel 5, you use a build root. It compiles the Linux kernel and creates a new one. Those of you who use Raspberry Pi will probably be familiar with this. Build root compilation takes about an hour, and as the version goes up, the amount of compilation also increases, taking 1 hour and 20 minutes for kernel 6. The compiled kernel was completed well, but there was a problem where the console did not appear at all, as shown in the capture below, and it took 5 days to fix this. I asked wjz304 for help yesterday, but rr said that it was just a coincidence and that there were no console issues like this. In the end, I couldn't get any help, and last night, before I went to bed, a bright idea occurred to me, so I googled it and managed to find it. It seems like the know-how is not as widely known as you might think.
 4 points
 -
Personnellement, je ne jouerai pas avec ce service pour des raisons évidentes... Déjà de base envoyer des données vers l'extérieur je trouve toujours ça moyen, mais dans le cadre d'XPEnology c'est un coup à se faire bannir son compte Synology.4 points
-
Please don't, your contributions are very much appreciated and we don't want to lose you! Ignore the trolls mate, they're just jealous of your skills!4 points
-
https://github.com/wjz304/rr/releases/tag/23.10.5 https://www.youtube.com/watch?v=C3fLIpaFpMs4 points
-
News: The driver and necessary firmware have been integrated into https://github.com/wjz304/rr of version 23.11.6 and newer. It's expected to work out of the box if you use this loader.4 points
-
It’s about time to give some love to the Qnap community. Do we have any targeted models you would like to focus ? Eg TS-1655, TS-1273 etc4 points
-
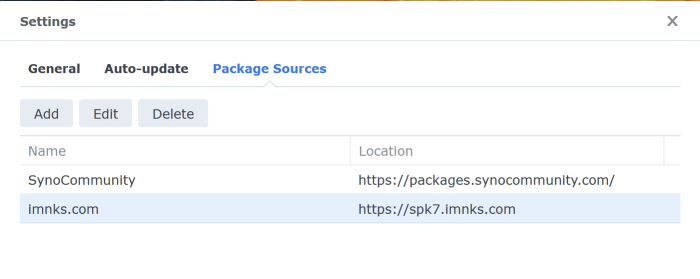
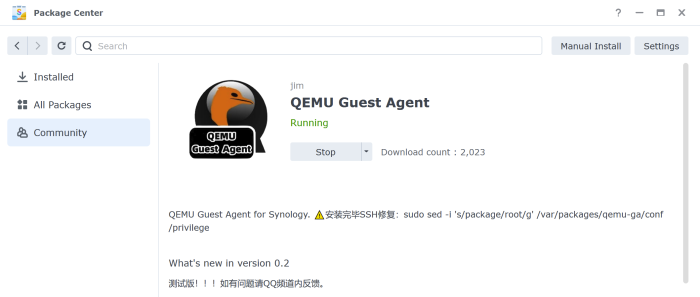
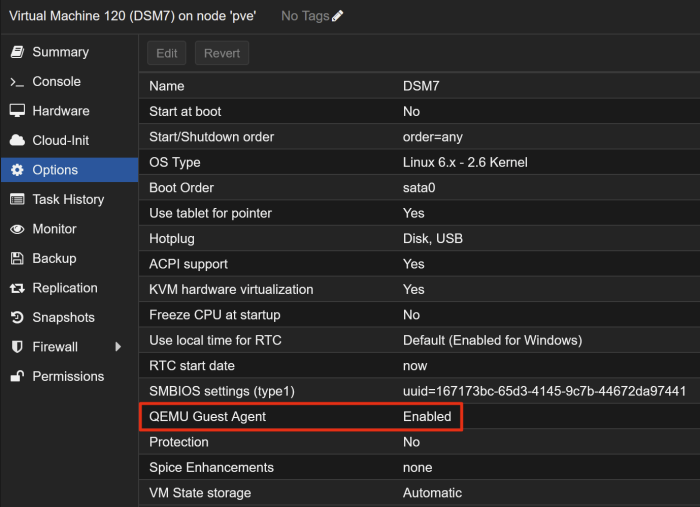
It is possible, you need to add software repository https://spk7.imnks.com Find Qemu Guest Agent tool Install it and don't start at first. Then you need to ssh in your Xpeno and run this command, as described: sudo sed -i 's/package/root/g' /var/packages/qemu-ga/conf/privilege After that you need to stop Xpeno VM, turn on Qemu Guest Agent in VM options at Proxmox console: And start your XPeno VM again with working Qemu Guest Agent integration.

 4 points
 -
Distribution of TCRP 7.2.1-69057 revision has been completed. When you enter the TCRP Loader Build menu, the latest version will be automatically updated. you will see a new menu for 7.2.1-69057. Please build using only this new menu. Building the loader should take priority over installing the pat file from the control panel of previous versions of DSM.4 points
-
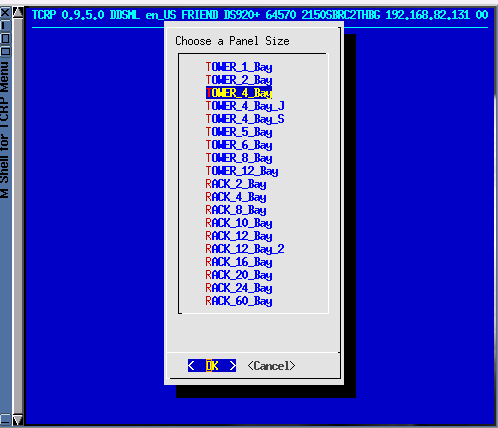
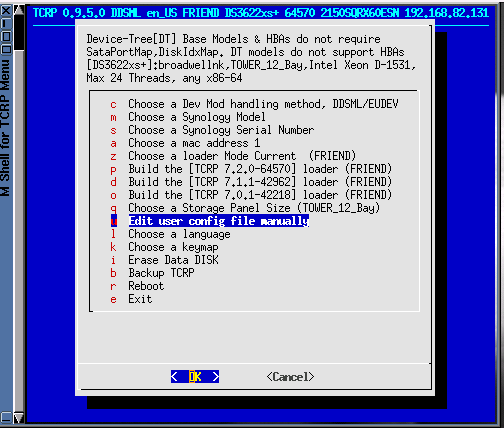
[NOTICE] M SHELL for TCRP v0.9.5.0 is released. https://github.com/PeterSuh-Q3/tinycore-redpill/releases/tag/v0.9.5.0 Added storage panel size selection menu and applied processing Addon (StoragePanel). Thanks to @wjz304 If you enter the loader build menu, you will see the new menu below activated by automatic update. The bay size of the storage panel is basically selected as the size of the genuine model. You can choose the size you would like to change. After that, just build the loader as usual. If you want to change the bay panel type again after using it, Even if DSM is already installed, you can run the Change Storage Panel registered in the manual scheduler. The size selected at the time of the loader build is the last one recorded. After editing, you can record one of the examples written after the # in the option at the back of storagepanel.sh in the task settings without typos. The size of the M.2 bay is arbitrarily set to 1X4. If you write only the desired number in ?/# in the form of ?X#, the size of the M.2 bay changes accordingly. The ? number in front is the singular number, and the # number after it is the quantity for each stage. Modify the option after .sh, check it, execute it, and reboot once to reflect it.

 4 points
 -
You were angry? The developers here do so much work getting this working for our benefit. If you don't like it then please make your own loader.4 points
-
Redistribution has been completed to correspond to 64570-1. Use after ./my.sh update or Please reboot with this TCRP Loader Build and enter again. M SHELL will be automatically updated.4 points
-
ams for DSM 7.2 ds3622xs+ hp-ams ds3622xsp 4.4.302.zip4 points
-
Currently working on 7.2-64570. Please wait a bit.4 points
-
The TCRP HTML Builder has reached a stable status and it is available for all to test and report any additions or ideas to improve. Thanks to all for the assistance in testing and especially @pcristi for pointing some bugs Thanks Mate ! You can have a look at : https://github.com/pocopico/tinycore-redpill/wiki/TCRP-Web-Builder More pictures and a how to manual will be soon be in the WiKI section of the repo. To try please download latest 0.9.4.8 and point your browser to the TCRP ip e.g. http://yourip4 points
-
Automated RedPill Loader (ARPL) added. This should have been done long time ago. Sorry @fbelavenuto4 points
-
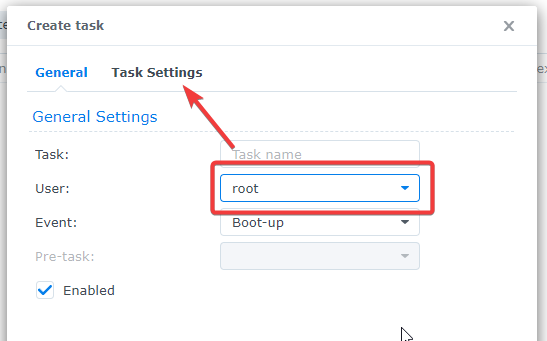
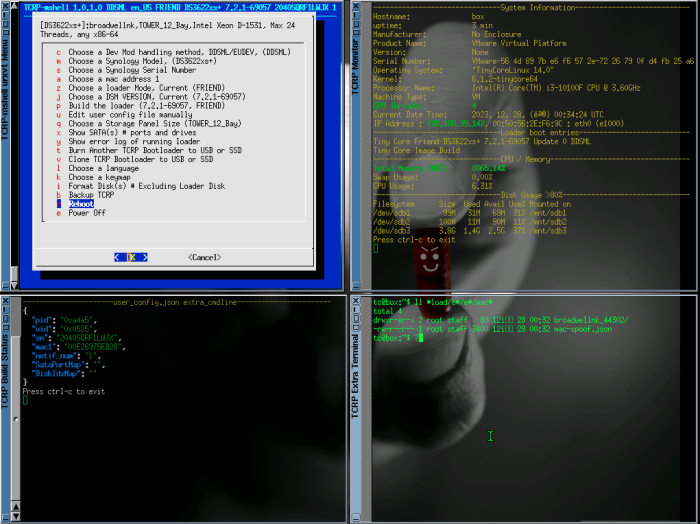
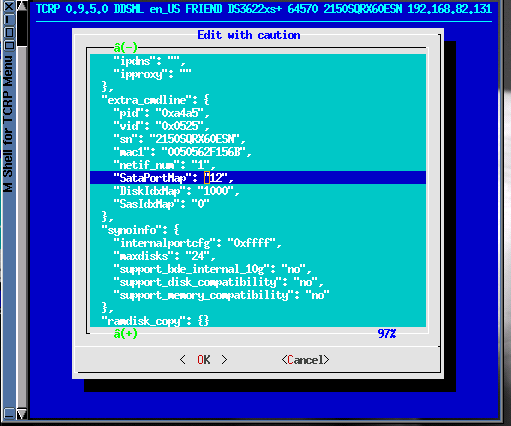
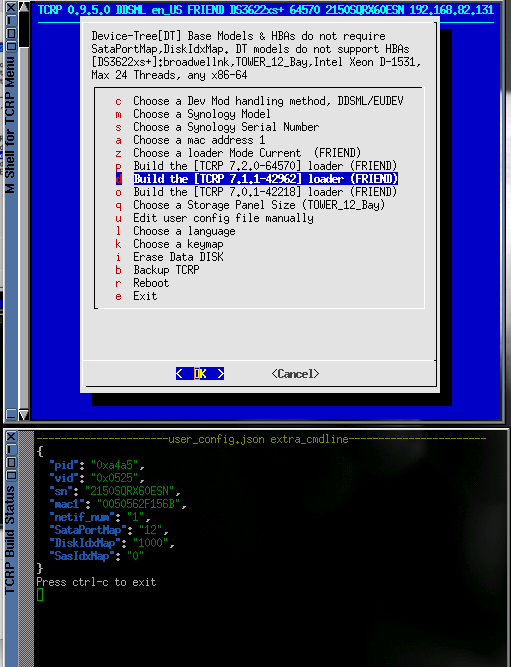
1.Select the menu to edit user config as shown below. 2.When you enter the menu, it changes to editing mode as shown below. Edit as shown below and move the focus to the OK button with the Tab key once. Save and exit with the Enter key. Be careful to avoid typos. 3.If it is changed normally, you will not be able to see the MaxDisks item. You can check in the window at the bottom right that the remaining three items have changed. 4. Now please rebuild the loader.
 3 points
 -
Yep. The random reboot was not the loader but my motherboard (hardware pb). Since I changed it, no problems at all...3 points
-
And that's the right thing to do.3 points
-
I will add acpid as an addon of M SHELL by referring to aprl's addon. I forgot because I don't often test VM Proxmox.3 points
.thumb.jpg.5487221b3b2d688ffe9cbcb810a32255.jpg)